Thursday, July 31, 2014

LED Lettuce, The HydroTower And LED Humboldt Hydroponics

Tonight's blog post has two tales of LED grow lights and the planting of a seed for a future collaborative project in the Humboldt Microcontrollers Group.
LED lettuce (from Wired.com)

On July 11, Wired had an article titled, "LED-lit indoor farm produces 10,000 lettuces a day." Because several members of the Humboldt Microcontrollers Group have expressed an interest in using microcontrollers (MCUs) for automated or indoor plant growing, the 'LED lettuce' article caught my interest. The Wired article presents some pretty impressive statistics.
"A newly opened indoor farm in Japan has been built with LEDs that emit light at wavelengths optimal for plant growth...It's 2,300 square metres, making it the world's largest LED-illuminated indoor farm, and is already producing 10,000 heads of lettuce per day. The LED lamps allow Shimamura to adjust the day-night cycle for the plants, allowing them to photosynthesise during the day and respire at night. Discarded produce is cut from 50 percent of the harvest on a conventional farm to ten percent, and the lettuces grow two and a half time faster...stringent climate control means that water usage is just one percent of the amount needed by outdoor fields."
I can understand that the indoor growing and carefully controlled ambient conditions would reduce the amount of water to grow plants compared to outdoors. But it seems a real stretch to believe that the LED lettuce farm only uses 1% of what would be used for an outdoor lettuce farm!

Calvin students HydroTower workshop area
The second LED grow light project took place in my hometown -- Grand Rapids, Michigan. That project was the HydroTower, the senior design project for a group of Calvin College students. The HydroTower was a fully automated hydroponic garden for home use, using an MCU for control and LED lights to enable photosynthesis and plant growth. This MCU / LED grow project popped up in a Google search after I read the LED lettuce article. Since the HydroTower happened in Grand Rapids, it seemed appropriate to find out a little more. The Calvin College alumni 'magazine' Spark says this about the HydroTower:
"In October, the team researched hydroponics, learning about the floating, misting, and flood-and-drain (ebb-and-flow) methods of growing...their HydroTower would be constructed of a 20-by-32-by-32 inch base unit, to house the electronics and plumbing, and two open growing levels, each measuring 24 by 32 by 32 inches. The unit would operate on an ebb-and-flow system, and it would irrigate the plants and dispense nutrients automatically...In November, Team HydroTower broke the project into components, and each student engineer took one. DeKock would construct the
HydroTower is finished
tower. Kirkman would engineer the water and piping. Vonk would create the LED system, using only red and blue lights because those are the only colors of the spectrum that plants absorb. Meyer would program the microcontroller that controls the LED lighting, the pump and valves, and the touch-screen user interface. And Eelkema would create the pH and electroconductivity sensors that handle nutrient control—a system, the team emphasized, that sets HydroTower apart from other hydroponic farms. “The sensors would input into a microcontroller, which would then use algorithms to decide which nutrients need to be replenished,” Eelkema explained. “The only problem with that is the biology and chemistry research is far more advanced than we have time to cover. Right now I am shooting for a best guess that I know won’t kill the plants
."
The Calvin College students' project website gives this final update on the project:
"All through April and the first week of May Team HydroTower worked...to finish the prototype. The month of April saw the addition of our second growing level and some new plants. Other major accomplishments made before Design Night were completion of the pH and EC sensors, a working User Interface on the touchscreen...On May 7th the Engineering department held their annual Senior Design Open House where the team answered questions and took comments about the HydroTower. Later that evening the team gave a presentation detailing some of the work and challenges they faced during the past year...HydroTower is a finalist in the IEEE President's Change the World Competition. The project has been selected as one of 15 finalist entries and the top three winners will be announced at the end of May."
Humboldt Laser Harp v.1.0 nearly finished
It seems like the first collaborative project from the Humboldt Microcontrollers Group, the Humboldt Laser Harp v.1.0 (HLH), is well under way. Ed Smith said today that the HLH was being played by his kids in his kitchen. We will no doubt be working on improvements to HLH v.1.0, and at some point will start planning for v.2.0.

But this seems like a good time to plant a seed for another MCU group project. And a project involving some type of hydroponics and LEDs seems like a good target. I'll be reaching out to a few people to see if they want to work on that kind of a project. If you're interested in being involved with an MCU / LED garden project, contact me at arcatabob (at) gmail {dott} com.

**********

Wednesday, July 30, 2014

Grilled Cheese Smart Box: Microcontroller And A Whole Lot More

The Smart Box uses a microcontroller (mcu), and a whole lot more, to keep fresh grilled cheese sandwiches hot, moist and crisp.
Fresh, tasty, warm grilled cheese sandwich

The Smart Box is an innovation that dramatically demonstrates two sometimes overlooked non-electronics aspects of MCU-focused projects that can require as much work as the electronics, if not more work. Those two non-electronics issues are:

  1. Figuring out what you need the MCU to control.
  2. Figuring out all the non-electronic hardware issues for the project.
The goal of the Smart Box designers was to create an environment that could extend the 'highly edible' lifetime of a fresh grilled cheese from seven minutes to at least thirty minutes. As Fast Magazine tells the story, the design team tried to find,
"...a way to extend the sandwich's woefully short shelf life. They discovered that each Melt had about seven minutes before going cold, leaving the cheese to congeal and making for a subpar grilled cheese-eating experience...the team looked far and wide for a food transport box that could maintain just the right temperature while striking the right balance between moisture and crispiness for 30 to 60 minutes at a time...what we realized is that if you maintained the temperature, and you had even airflow, and a way to get some of the moisture out of the product as it sat in the box, that it can hold a Melt for over 20 minutes and still meet temperature, moisture, and crispness guidelines."
Sandwich container with ridges and holes for hot air circulation
The first part of the MCU project had nothing to do with an MCU. Most products and design projects involving an MCU will start by figuring out how the product or project ought to work to achieve the project's goal. For the Smart Box, the goal was a good tasting sandwich. So the first part of that project was to determine what ambient conditions would keep the sandwich from getting cold and soggy. It was obvious the grilled cheese sandwich storage and transport unit would need heat. They would have to keep the temperature low enough so it didn't cook the sandwich more, but high enough so the cheese would be nice and soft. And the temperature would need to be uniform throughout the sandwich storage and transport unit. After experimenting with different conditions, and probably eating quite a few grilled cheese sandwiches, they found the right temperature (190 - 200 degrees F) and the right moisture to keep the sandwich tasting good.

The next step was to develop a combination of materials, shapes, heaters, fans, etc, that would maintain the necessary temperature and moisture for the sandwiches. Air flow was key, both throughout the large insulated food transport box and throughout the smaller sandwich containers that sit on the shelves inside the food transport box. The majority of this physical design and development work didn't focus much on electronics of the project, other than to keep the fan pushing air and to keep the heater warming up the air. The Fast Company article explained:
"...for any of this to work, the air had to circulate around the sandwich so that the heat surrounding it was constant, like a convection oven with size restraints...Here's how it works: It uses a hot plate made out of aluminum to keep everything warm. But since direct heat can burn its contents, it's covered with a shield while an internal fan ensures proper air circulation. The whole system is sensitive, so inside are sensors that monitor the environment for precise heat and humidity levels. A microcontroller is used to make small adjustments automatically, ensuring that the grilled cheese arrives at your door or desk nice and toasty."
Once the physical design of the box was mostly figured out, the electronics wizards started working their magic. They figured out what temperature sensors to use and where to put them. The fan power and controls were designed and the rest of the MCU functions were programmed.

I'm sure figuring out the sensors, controls, MCU and programming took much longer than the length of the above paragraph indicates. But for the grilled cheese Smart Box, there's little doubt in my mind that the design-build issues requiring non-electronics 'maker skills' or physical design knowledge took more time and brainpower than the MCU-related part of the project. The Smart Box illustrates why the Humboldt 'makers' who really enjoy MCUs also need lots of other types of knowledge or need to collaborate with others who have the non-electronics skills.

**********

Tuesday, July 29, 2014

Sky's Not The Limit For Arduinos In Space

'Arduinos In Space' could be the tagline for the two microcontroller (MCU) products that are the topic of tonight's post -- Ardulab and ArduSat.

Ardulab has been completely open-sourced (from ArduLab)
First off, Ardulab. Although some may find it a skoosh misleading, SpaceRef's July 25 article about an Arduino in space is titled, "Infinity Aerospace's Ardulab Makes Building & Launching Space-Certifiable Hardware As Easy As Baking Cookies." I baked cookies tonight. Oatmeal-raisin cookies. They tasted good. Baking them was more difficult than walking across the street and buying cookies from the North Coast Co-op. But it was much less challenging than building and launching space-certified hardware. On the other hand, baking cookies was also definitely much less rewarding and interesting than launching space hardware.

Ardulab projects are intended to democratize the hardware needed to perform experiments on the International Space Station. According to the SpaceRef article,
"Today Infinity Aerospace announced the complete open-sourcing of Ardulab, the Arduino powered platform for building and launching simple experiments to the International Space Station. Previously costing space researchers, students, and experimenters between $2,000 - $3,500 per kit, anyone can now build and launch an off-the-shelf space-certifiable experiment, with the only costs being building their equipment and launching it. When it was originally conceived back in 2012, the fundamental idea behind Ardulab was to give as many people as possible the tools and information they need to be successful in space. Making Ardulab a completely open-source platform allows for all of the intellectual property to be used to its full extent. The Ardulab is a plug-n-play electronics platform with all of the necessary features and interfaces for use on the International Space Station."
'Moon' redwoods behind CCAT on HSU campus
It seems like Humboldt creative minds could come up with a few unique and worthwhile space station experiments. Maybe something involving redwoods in space. After all, there are already redwoods growing on the Humboldt State University (HSU) campus grown from seeds that orbited the moon in 1971. Using the Ardulab platform, the Humboldt Microcontrollers Group could help build the hardware for the experiments that get accepted by NASA (National Aeronautics and Space Administration). Or the MCU group could help organize a design competition for an Ardulab project. That might be a fun and effective way to get Humboldt students interested in learning how to design and build Arduino-powered projects and might also get them interested in space. It would just be a extra bonus if one of the Humboldt Ardulab competition projects was accepted by NASA to be sent up to the space station. Maybe the end result would be that we'd have another batch of aerospace redwoods growing on the HSU campus.

The second 'MCU in space' item for tonight's post is the ArduSat. The backstory for ArduSat, designed and built by the space startup NanoSatisfi, is an intriguing one if you're interested in how a microcontroller project went from a concept to company that just received $25 million in funding. The backstory can be told as a couple guys that designing a cool, innovative and useful piece of technology in a California garage -- the Singularity Hub article "Space Exploration On The Cheap: Kickstarter Sensation NanoSatisfi Launches in 2013" says:
"NanoSatisfi is based out of a collective workspace provided by tech incubator, Lemnos Labs, and situated near the ballpark in downtown San Francisco. Upon arrival, one is greeted by a nondescript front door sporting a few haphazardly labeled buzzers...NanoSatisfi doesn’t have a buzzer—Lemnos Labs is in the garage."
ArduSat in space (from Singularity Hub)
Or the backstory can be looked at from a different perspective that seems a bit less grassroots bootstrapping, with the same Singularity Hub article explaining that:
"Singularity Hub asked Peter Platzer, co-founder of NanoSatisfi, to elaborate...Platzer began his career as a high-energy physicist at CERN [Conseil Européen pour la Recherche Nucléaire; same place the Internet was 'invented']...After CERN, Platzer went to Harvard to get his MBA and wound up running a $500 million quant fund on Wall Street."
The Wikipedia entry for ArduSat has a timeline for the project, but the big picture is that NanoSatisfi ran a Kickstarter campaign for the ArduSat and got over $100,000, about three times what their original funding goal was. They followed that up by raising over a million dollars more. Apparently that wasn't enough money to successfully launch that ArduSat, because they just announced today, July 29, that they have raised $25 million and changed their name from NanoSatisfi to Spire, Inc.

The Wikipedia entry described ArduSat this way:
"ArduSat is an open source, Arduino based Nanosatellite, based on the CubeSat standard. It contains a set of Arduino boards and sensors. The general public will be allowed to use these Arduinos and sensors for their own creative purposes while they are in space...ArduSat is the first open source satellite which will provide such open access to the general public to space."
If there are a few civilian space enthusiasts in Humboldt, we could pull together a complex, interesting, challenging and fun project or competition involving both Ardulab and ArduSat, two MCU-controlled projects that Humboldt people could work on. That's one project that would truly be out of this world!

**********

Monday, July 28, 2014

Humboldt MCU Opportunity: Tech Companies Recruiting IoT Developers

One of my goals for this blog is to identify ways for Humboldt microcontroller (MCU) users to earn money and to try to highlight those money-making opportunities for people who are interested in them. It will help Humboldt people and the regional economy if we can increase the number of Humboldt MCU-related paid projects and jobs.
IoT concept graphic (from comsoc.org)

Wired.com had a short July 25 article, "Tech Giants Begin Recruiting for the Next Big Platform Wars", which talked about a technology-economy trend that Humboldt MCU people should be aware of and should look at as an opportunity for projects or jobs. The article says that the Internet of Things (IoT) is going to be a huge revenue opportunity for MCU developers, the 'next big platform.' The 'killer app' for the IoT hasn't come over the horizon yet, and there is no clear leader among companies competing to cash in on the billions of dollars expected to be spent on embedded computing systems and other IoT products and services. Even though no company has a firmly established lead, those organizations who want to have a chance in this race are hiring technical people, including MCU developers, to create and improve their organization's products. As Wired puts it:
Microcontroller (from ti.com)
"The Internet of Things is still young, but it’s real. There are already dozens of internet-connected devices available, ranging from home-automation tools to wearable fitness trackers. And it’s about to start growing at an even faster pace. According a new survey...17 percent of the world’s software developers are already working on Internet of Things projects. Another 23 percent are planning to start an IoT project within the next six months. The most popular devices? Security and surveillance products, connected cars, environmental sensors and smart lights and other office automation tools. The world’s largest tech companies are already in fierce competition to attract developers to their respective connected device platforms. After all, the winners of these new platform wars will define the future of computing."
Two previous technology-economy trend platforms early stages that employed a lot of developers were when businesses started having websites on the Internet and when the iPhone catalyzed a huge market for smartphone apps. New sustainable trends have a tipping point where the trend actually becomes an important economic factor and creates a significant amount of ongoing sales and reliable employment. The IoT appears to be approaching that tipping point, and the Wired article is saying the trend is sustainable and there will be a large number of steady employment opportunities for IoT developers. The Barrons.com article "Silicon Labs Tuned In for Upside" phrased it this way:
"...we don't think IoT for Silicon Labs will turn out to be an overextended hype cycle. Connected/smart-home adoption has parallels to smartphones in 2008, where developers created unanticipated high-value applications on a platform to drive rapid adoption. From that perspective, 50 billion IoT devices by 2020 does not seem unreasonable."
Other recent articles about MCUs, embedded computing and the IoT have also talked about MCU-developer opportunities in the upcoming months and years. So the question at this point is, 'how can Humboldt developers get involved with the IoT platform to make money?' I'll talk more about this topic in some of the future posts on this blog. But for now, Humboldt MCU developers and users might consider doing some or all of the following activities.
  1. Learn a lot about the IoT and microcontrollers and keep up-to-date on these two topics.
  2. Learn more about the IoT and MCUs by designing and building unique projects and document them online.
  3. Use the internet to document and promote your IoT and MCU knowledge and skill.
  4. Teach a class about Arduinos, MCUs or the IoT.
  5. Build and promote interesting MCU / IoT products and sell them online.
  6. Identify and reach out to knowledgeable and interesting people who are relatively well-connected in the IoT and MCU communities.
  7. Use craigslist and other online developer job boards to look for MCU / IoT job or project opportunities and to advertise your availability for MCU / IoT projects and employment.
All the above activities can be done without participating in any of the Humboldt Microcontrollers Group meetings or collaborative MCU projects.

But the above money-making activities can also be done with people who are active in the Humboldt Microcontrollers Group. In my experience, it's often more fun and more interesting to work on projects or activities with other people who have complementary or similar knowledge and interests. If you're interested in discussing any of the above IoT money making opportunities, come to the next MCU meeting. Or email me at arcatabob (at) gmail {dott} com.

**********

Sunday, July 27, 2014

Arduino And littleBits

So yesterday's post was about littleBits and the new cloudBits that seems to make it pretty easy for littleBits to play with the Internet of Things. Writing that post made me curious about the combination of Arduino and littleBits.
Arduino-At-Heart module for littleBits

A TechCrunch article from May 2014 covered the Arduino-At-Heart module for littleBits and the Arduino Starter Bundle. TechCrunch explains the collaboration between these two tech ecosystems this way:
"The world of littleBits...can now play friendly with Arduino. If you’re not familiar with littleBits, it might help to think of it as a DIY Electronics kit mashed up with LEGO. Each “bit” is an individual electronic component, like a speaker, or a light sensor, or a blinky LED. Snap them together, and you can do all sorts of cool stuff — no programming required...That “no programming required” point has always been one of littleBits’ biggest strengths; it meant that anyone could start putting stuff together, pretty much by accident. Alas, up until now, “no programming required” also meant “no programming allowed”...The littleBits idea is great — but once a particularly enthusiastic user hit the limits of what their kit could do, the next step (learning to
use a standalone Arduino board, which meant also learning proper circuitry, soldering, etc.) was suddenly a pretty big one...This morning, littleBits is introducing an Arduino module into the mix. It’ll snap right into place — no soldering required — just like the other littleBits modules, with one big difference: it’s programmable. You get the programmability of an Arduino, without having to learn the myriad other prerequisite skills. You jack into it via the onboard microUSB port, upload your programming via the standard Arduino IDE, and all of your littleBits modules fall in line."
The Engadget May 2014 coverage of the littleBits Arduino module rollout talks about some of the advantages of this module:
"...it also opens the door to interaction with your computer. Since the Arduino module has USB support built-in, you can create Etch-A-Sketches, Pong games and other programs that have LittleBits and your PC working in harmony. Rothman adds that many existing Arduino projects should work with only a few slight tweaks to pin assignments."
Arduino Starter Bundle for littleBits
This Instructables shows what was previously involved with adding Arduino capabilities to the littleBits synth kit before the Arduino-littleBits modules became available.

To learn more about the littleBits Arduino module, check out the webpage for that module. If you want to know more about the littleBits Arduino starter kit, here's a link to that webpage.

At the next meeting of the Humboldt Microcontrollers Group, I'll ask how many people there have worked with littleBits. If no one has, it would be an interesting exercise to get a few littleBits modules and see what all the options are for combining them with traditional microcontroller projects. If you have littleBits modules and are coming to the August 7 MCU meeting, please bring them to the meeting. Thanks!

**********

Saturday, July 26, 2014

Little Bit of Information About LittleBits

So I'm pretty sure everyone reading this blog knows what the Internet of Things (IoT) is. Anyone who likes to use or read about microcontrollers (MCUs) has probably read a couple news stories about the IoT or at least about how some microcontroller is being used in the IoT. The topic of tonight's blog is littleBits, which are now "an easy and open way to contribute to the Internet of Things without wasting time prototyping devices from scratch."

littleBits circuit with module snapped and wired together
In addition to that preceding description of littleBits, the July 23 Engadget article about these modular electronic marvels says:
"The magnetic, interconnecting circuit boards that make up LittleBits' library of electronic modules make it easy to build all sorts of neat (and noisy) devices with almost no technical knowledge at all...today LittleBits is announcing the Cloud Bit, a new module that, as company CEO and founder Ayah Bdeir puts it, allows builders to "just add internet" to almost anything...More complex modules -- like the Arduino module and today's WiFi-enabled Cloud Bit -- raise the ceiling of complexity for potential LittleBits projects. It's her hope that the product will be used for rapid prototyping of new ideas in addition to being a fun hobby toy. "If you wanted to recreate a Nest or recreate a Sonos or a DropCam, you could. If you wanted to create the next billion dollar idea, you could do that..."
cloudBit
The Wired article announcing the cloudBit has this to say about the new component and about littleBits in general:
"The cloudBit, announced today, is a new component that’ll connect any littleBits creation to the internet, allowing it to be programmed through a simple web interface. There have been other kits like this before, powered by Raspberry Pi and Arduino—but while those remain powerful, flexible, and inter-operable, none of them possess littlBits’s plug-and-play simplicity. So with the addition of the cloudBit, littleBits could become a reasonable, DIY gateway to the Internet of Things...Rigging together motors, sensors, and noisemakers can be painstaking work, requiring lots of soldering and testing equipment to make sure all your circuits are done right. littleBits, instead, is a modular library comprising dozens of neat electronic components that simply snap together in a line, with magnets...To get started, users first sync their cloudBit to the web app. From there, the web app can link to any any web API, including IFTTT (a service that allows you to chain together websites with simple “If this, then that” logic). Users can then use those data streams to turn the cloudBit on or off, or activate any partial state in between. By linking the cloudBit to any number of other bits, users can create whatever chain of mechanical reactions they like...the littleBits ecosystem now has 59 different components, ranging from basic items like motors, a microphone, and a keyboard to a growing body of sensors that detect everything from light to bends to motion to pressure. (There’s also an Arduino component, for more serious hacking.)"
littleBits' tagline is "the easiest and most extensive way to learn and prototype with electronics." Maybe it's because I'm an engineer and not a marketing person, but from my perspective, it seems unlikely for any product to be both the "easiest" and the "most extensive" way to learn and prototype with electronics. My guess is that littleBits is probably a lot closer to the 'easiest' claim of their tagline than the 'most extensive' claim.
littleBits 'Big Drone Synth' 

In spite of their overreaching marketing department, which may be an apt description of the marketing department at pretty much every company, I do feel littleBits does have a strong appeal for non-technical people who want to incorporate technology into unique or interesting products that they've created in their minds. If an artist, sociologist, psychologist, disaster worker or many other types of people with no desire to figure out how to breadboard an Arduino circuit can fairly quickly learn how to snap together a couple modules that accomplishes something meaningful to them, they will tend to use that product again in the future and start learning how to do more with that product and complementary products.

What this potential appeal for non-technical people says to me is that if littleBits can figure out kits that are useful to a large number of target users and successfully market those kits, it could very likely lead to an active, growing and loyal user community. By removing the Arduino barriers (perceived or real) of learning at least the basics of electronic design and programming basics, littleBits has given itself a much larger potential market. The challenge for littleBits now is figuring out what modules will appeal to and get buzz among non-tech early adopters.

littleBits DIY smartphone-enabled thermostat
I think it would be interesting for the Humboldt Microcontrollers Group to build a product with littleBit modules, then build an MCU-based product that has the same capabilities and features of the littleBit product. We could benchmark the operation of both products, compare the component and build costs for both products and keep track of the actual build time to go from loose components to a properly and reliably operating unit. The main thing stopping us from doing that is the lack of components. If I can identify clear benefits for sponsors, I'll put together a project proposal for doing that comparison and pitch the project to potential sponsors.

One side note of particular interest to me is the IFTTT aspect of littleBits. Ever since I read about 'if this then that,' a couple years ago, I've wanted to experiment with it. Doing a littleBits project would be a good excuse to set up some IFTTT 'recipes' and figure out how much value the service has for me. I'll have to bring up IFTTT at the next MCU meeting to find out how much, if any, people at the meeting have done with it.

If you're reading this blog post and have used littleBits, please come to the next Humboldt Microcontrollers Group meeting, which will be from 6 to 8 PM on Thursday, August 7, to talk about your experience with them and to demonstrate how to use them.

**********

Friday, July 25, 2014

Electric Waste Orchestra + Humboldt Electronic Light Orchestra?

So a couple days ago I read about the Electric Waste Orchestra (EWO) in PSFK. It seemed like an idea that is harmoniously complementary to the Humboldt Electronic Light Orchestra we're working to kickstart with the Humboldt Laser Harp project. Then today I met Tibora Girczyc-Blum, the director of SCRAP Humboldt, and I realized how well the EWO concept meshes with the SCRAP Humboldt mission. Per PSFK:
Electric Waste Orchestra hard drive instrument
"The Electric Waste Orchestra at Makerspace Urbana, located in Champaign-Urbana, Illinois, takes outdated technology and turns them into pieces of fully functioning musical equipment. One guitar, shown in the video above, is comprised of an old keyboard number pad, six hard-drives, Arduino hardware and some software, all of which will not decay into toxic waste. They have other musical hardware in the works, including a Wiimote, and yes, they can all create beautiful music. The electric orchestra is a clever way to bring new life to these old technologies...It’s nice to see people taking these old gadgets out of the dumpsters
Arduino controlling the hard drive instrument
and onto the stage to bring others joy
..."
Here is a YouTube list of the EWO videos. It looks like they're in the early stages of learning to play somewhat 'traditional' music with their Aduino-controlled instruments. However, some of the music played in the video embedded in the PSFK article seems closer to circuit bending than to traditional music. If you're not familiar with circuit bending, Wikipedia says circuit bending is:
"...the creative, chance-based customization of the circuits within electronic devices such as low voltage, battery-powered guitar effects, children's toys and digital synthesizers to create new musical or visual instruments and sound generators. Emphasizing spontaneity and randomness, the techniques of circuit bending have been commonly associated with noise music, though many more conventional contemporary musicians and musical groups have been known to experiment with "bent" instruments. Circuit bending usually involves dismantling the machine and
Cateura sax from trash
adding components such as switches and potentiometers that alter the circuit
."
You'll likely get a different definition of circuit bending from every person you talk to about it, but "BEND: A Circuit Bending Documentary" is a relatively good place to start if you're new to the genre.

While circuit bending is an aspect of the EWO that microcontroller people would likely enjoy, creatively reused materials seems to be an aspect of EWO that's more along the lines of what SCRAP Humboldt would focus on. When I did a YouTube search for  arduino recycle electric instrument, two of the more interesting finds were The Recycled Orchestra of Cateura and Bash The Trash. There are countless other videos of musical instruments made from upcycled goods, so if Humboldt musicians and upcyclers want to join forces, there
Bash The Trash cardboard trombone
are plenty of examples out there to learn from, and homegrown ingenuity can add local flavor to the effort. Most of the instruments in these videos aren't based on Arduino or other microcontrollers (MCUs), but there are plenty of musical instruments made with the SCRAP Humboldt approach to creatively reusing materials, and there are enough MCU-controlled instruments to make it an enjoyable challenge for the electronically-inclined members of the Humboldt Microcontrollers Group.

Make some music (with any type of instrument or source materials you prefer) and make the world a better place!

**********

Thursday, July 24, 2014

Humboldt Microcontrollers Group: July 24, 2014 Meeting Notes

Redwood Curtain Brewing Company
This is a summary of the July 24 meeting of the Humboldt Microcontrollers Group at The Link in Arcata, California, behind the Redwood Curtain. Speaking of the curtain, maybe the Humboldt Microcontrollers Group should schedule an upcoming meeting to be held at Redwood Curtain Brewing Company. Microcontrollers can be used in brewing...

One of the reasons for this blog and for the formation of the Humboldt Microcontrollers Group is the redwood curtain, which is both an actual and perceived barrier between Humboldt County and the rest of the world. In many ways, that curtain is a much appreciated and highly beneficial barrier, preserving natural beauty, creating a slower pace of life, and leading to a better balance between work and non-work activities. But in other ways, that barrier brings economic challenges and limits both the job opportunities for people and growth opportunities for
The curtain between Humboldt and the rest of the world
companies. One way to reduce the redwood curtain barrier for people and companies in this region who work with microcontrollers (MCUs) is to connect, strengthen, and promote the Humboldt microcontroller community. This blog and the Humboldt Microcontrollers Group are both working to connect, strengthen and promote that community.

So, the main topic of the July 24 meeting of the MCU group was the #8 Jeremy Blum Arduino video tutorial (see also my previous post about that tutorial). The focus of the #8 tutorial is SPI (Serial Peripheral Interface), and Jeremy uses an AD5204 digital potentiometer to demonstrate the use of SPI. Ed Smith used a different digital potentiometer than the hard-to-find AD5204 when he did the #8 tutorial exercise, so the sketch Jeremy wrote in the tutorial doesn't work correctly because of the differences in the two potentiometers. We'll have to figure out an appropriate alternative potentiometer and accompanying code for other Humboldt people who want to do the #8 tutorial exercise. One more item to add to the list of things-to-do regarding developing a set of effective learning tools for people in this region interested in MCUs.

No one at the meeting had actually worked through the exercise in tonight's video. Since none of the people at the meeting tonight had done the exercise, we didn't spend too much time talking about either the technology of a digipot or about interesting or unique aspects of SPI. Maybe at a future meeting? My plan is to talk with Ed, Nick and anyone else interested to agree on a good alternative digital potentiometer and to modify or rewrite the Arduino sketch to work with the digipot we choose.

In addition to the #8 tutorial, the following topics were discussed at the meeting:
  • Somewhat related to the #8 tutorial, Bob asked about using a digital potentiometer (or other components / circuitry) to match color and intensity in a set of three LEDs that are simultaneously given the same input signal but seem to generate different colors. The LEDs are Cree PLCC4 (plastic leaded chip carrier) 3-in-1 SMD LEDs. Based on the little bit we could figure out during tonight's meeting about how the LEDs are powered and controlled, Nick suggested the first step should be to put an oscilloscope on the lines going to each 3-in-1 LED to confirm they're all seeing the same signal. Nick also said it's likely the LEDs are adjusted by PWM (pulse width modulation) rather than by varying the power to them, so the digipot would probably not be a possible way to adjust the colors. If all three are seeing the same signal, it would appear unit variability in the LED color output may be the issue. The spec for the LEDs says "Tolerance of measurement of dominant wavelength is ±1 nm" so that spec appears pretty tight. I need to research the issue of bin codes and figure out how to determine if the 3-in-1 LEDs we purchased for this order have green and blue LEDs all from the same bin code. According to the datasheet, the red LEDs only have one bin code (which identifies the wavelength range for that LED), but the blue and green LEDs for this particular component each have seven bin codes. So if some blues were at the bottom of the wavelength range and others were at the top, that might result in a noticeable color difference even with the same applied PWM signal. Of course, keep in mind that my knowledge about PWM signals applied to 3-in-1 LEDs, or other types of RGB LEDs, or even single color LEDs is extremely limited. Researching this will definitely be a learning exercise.
  • HLH frame
  • An update about the Humboldt Laser Harp (HLH) project was given to the group by Nick and Ed. Nick has the frame of the HLH just about completed. In the upper picture on the right you can see the laser harp frame. If you look near the top of the lower picture on the right, a bit of a laser beam is visible -- first sighting of the infamous HLH laser beams. One outcome of tonight's meeting is that Gordon will be working with Nick to design and build a base for the harp. Gordon also had an interesting suggestion for laser beam presence enhancement in brightly lighted areas. He suggested shooting the laser through a diffusing or side-emitting light pipe for part of the distance from the laser to the light sensor.
  • From a HLH programming standpoint, Ed has been crafting the code that will convince the Humboldt heavenly harp to generate many marvelous melodies. In version 1.0 of the HLH, the goal is to have a demonstration device that produces simple tunes and has a reasonable degree of casual interactivity with curious members of the general public. Future versions are envisioned that incorporate music-correlated lighting effects and more musical instrument capabilities, e.g. lots of simultaneous notes, note strength and fade effects, simulation of different musical instruments, allowing notes from several octaves, different type of controls for the musicians playing the HLH, etc. As with many other 'maker'
    HLH laser beam
    topics, there are lots of people who have specialized in the field of DIY electronic music, and much of what we'll be doing in the early days of the Humboldt Electronic Light Orchestra will be research on what's already been done, connecting with people in the DIY electronic music field who are willing to share their knowledge or who are interested in what we're doing, and starting to develop new (as far as we can tell) electronic music ideas of our own.
  • The plan is for Nick and Ed to get together this weekend, connect the hardware with the software, flip the switch, and see what happens on the HLH. Stay tuned for updates and videos...
  • We discussed the upcoming August 2 'maker fair' in Eureka, which has been organized by Origin Design Lab. Nick and Gordon will figure out if Gordon has any maker projects that would be good to have at the Humboldt Makers table. Shawn Dean from InPrinting will be at the table doing 3D printing demonstrations. It would be great if other Humboldt Makers can spend an hour or a couple hours at the 'maker fair,' which sounds like it will primarily be a craft fair aimed at being a selling opportunity for local craftspeople. Even if you can't be at the Humboldt Makers table, if you have an item that will be interesting to the general public, please contact Nick Appelmans or me (my email is arcatabob (at) gmail {dott} com).
  • Justin suggested the Humboldt Makers might consider doing a minor repair on the 3D printer that InPrinting nearly finished building some months ago, then figure out what else needs to be done to get the unit printing. We can discuss that at the next meeting as either an activity to spend a couple Thursday meetings on, or a project that one or several people would work on as time becomes available.
Hope to see lots of people at the next Humboldt Microcontrollers Group meeting, which will be on August 7.

**********

Wednesday, July 23, 2014

Visualizing Music With LEDs And Lasers

If you've been reading this blog, you probably know about the Humboldt Laser Harp project (HLH). Today's blog post is closely connected to the HLH, and addresses the general topic of ways to visualize music with LEDs and lasers.
John Van Duzer Theatre

The HLH is the first foray for the Humboldt Microcontrollers (MCUs) Group into connecting music with light. Nick A has done a little music-into-light on his own, but the HLH will be the first collaborative group project for this type of application. It will be fun to see where the HLH leads. If we can involve some of the fabulous Humboldt musicians with our projects to visualize music with LEDs and lasers, including some of the Humbodt State University students and instructors, the sky's the limit. Maybe in a couple years there will be a Humboldt Electronic Light Orchestra performance at the Van Duzer!

Laserium
My first experience with music and lasers was a Laserium laser light show in Seattle -- it was an impressive and immersive experience that I really enjoyed. That was many years ago and musical-light technology has come a long way since then. At this point the Humboldt Microcontrollers Group isn't trying to replicate or out-do the Laserium experience or compete with existing advanced lighting technology in the music world. As far as I know we don't have people in the group (yet) who have the knowledge and interest to design and build top of the line music light show equipment, or the funding to buy the components. But it will be fun to see what MCU-based 'instruments' and systems we build or experiment with. It will be fun if we can get some people in the group whose main passion related to MCUs is in the area of music or music-into-light.
Echo Rises 800+ LED music-into-light system

The Hack A Day post "800+ LED Wall With Diffuser Panel is a Work of Art" was the catalyst for today's blog post. It shows a music-into-light system from Echo Rises. If you watch the video in this post closely, you'll see its title or subtitle is 'How To Visualize Music Using LEDs.' For the Humboldt Electronic Light Orchestra, I'd like to extend that theme to include lasers. The Hack A Day post gives this overview of the Echo Rises system controlled by a Teensy MCU:
"What happens when you take over 800 individually addressable super bright RGB LEDs and house them in a giant diffused panel? You get awesome...[Epoch Rises] is a small electronic music and interactive technology duo who create cool interactive projects...for their live shows and performances. They love their WS2812B LEDs...it can take any video input, it can be controlled by sound or music, an iPad, or even generate random imagery by itself. The 800 LEDs are controlled by a Teensy 3.0 using the OctoWS2811 library...which is capable of driving over 1000 LEDs at a whopping 30FPS using just one Teensy microcontroller."
Noomis
Whoa!! Wouldn't that be fun, controlling 800 - 1000 LEDs with one tiny Teensy MCU. If we had one or two systems like that, and combined them with the HLH and Jonathan Spark's Noomis electronic musical instrument, we'd have a pretty good reason for serious and innovative musicians to collaborate with the Humboldt Microcontrollers Group.

Hack A Day also did an interview with Paul Stoffregen, the creator of the Teensy, talking about his latest version, the Teensy 3.1. You can buy the Teensy 3.1 direct from Paul's website, or from the regular places like SparkFun. I don't know of anyone who's used the Teensy, but I foresee that happening in Humboldt before too much longer.
Teensy 3.1

If you think it would be interesting, challenging and fun to help create eight or ten unique Humboldt music-to-light different but complementary systems that would form the nucleus of an awesome performance, show up tomorrow, July 23, for the next meeting of the Humboldt Microcontrollers Group. At the meeting we'll talk a little about the Humboldt Laser Harp, and also review Serial Peripheral Interface, the subject of Jeremy Blum's #8 Arduino video tutorial. See you from 6 - 8 PM at 1385 8th Street, Arcata, California, USA.

**********

Tuesday, July 22, 2014

Contests & Saving Money: RFduino, Road Tests, Special Buys And Reduced Prices

Tonight's post has four items that may be of interest to someone who wants to build something cool or save a few dollars on parts for MCU projects. First, we have two 'build something cool' opportunities.
RFduino

Symmetry Electronics and their ecommerce division, SemiconductorStore.com, are sponsoring a design-build contest called "We Know RFduino." The idea is to design and build something with RFduino, make and upload a video about your project, then promote the heck out of your project to get a lot of people to watch your video. The video with the most views in September 2014 wins $1000. There are also 2nd and 3rd place prizes. Everybody who participates gets a $25 store credit at SemiconductorStore.com when the contest finishes. (Here's a link to their Kickstarter campaign for a little background on the component.)

Four reasons for Humboldt microcontroller users to consider entering this contest are:
  1. Just for participating, you'll get a $25 store credit at the SemiconductorStore.
  2. If you win 1st, 2nd or 3rd place, you could win some cash.
  3. If you've been wanting to build an MCU project with wireless, this could be a good excuse.
  4. Having Humboldt people participate in this contest is a good way to promote the microcontroller community in the area. Even if you don't win, you might meet one or a few new people from Humboldt who are interested in MCUs.
The second 'contest' type MCU activities are the Road Tests at element14. The Road Test webpage at element14 says:
"RoadTest is a group dedicated to testing and reviewing new products. RoadTesters are chosen from element14 members who apply to test equipment and volunteer to write a review. The equipment provided to reviewers is mainly development or evaluation kits for microprocessors from manufacturers such as Texas Instruments, Freescale and Microchip. Test equipment is also occasionally featured with equipment from Agilent, Fluke, TTi and Tektronix. More recently the reviewers have been given other demonstration boards from traditionally analogue manufacturers like Analog Devices, Linear Technology and Maxim."
For more details, go to the Road Test webpage, look over the different Road Tests that are currently open, and if none of them sound right for you, keep an eye on new ones that come up.

Ed Smith made a good comment to me when we were talking about one of the MCU-related contests. He suggested that before you enter a contest, make sure the benefit you can get from participating in it is worth the cost. If you get a free $20 part and end up spending a bunch of additional money and / or time that you otherwise might not have spent, maybe the 'contest' wasn't worth getting into. Caveat emptor.

In the 'saving money' category for tonight's post, the first item is Jameco's 'Special Buys Outlet.' I got an email today from Jameco promoting their Special Buys. I looked at some of the stuff in their outlet, but I haven't done enough electronics to know if those are good prices for things lots of people actually want, or if it's clearance racks for items which have very narrow appeal. Check it out and see if there are any items you can't live without...

The other 'saving money' item for tonight's post is another element14 item -- their 'reduced prices on popular development kits & evaluation boards' special deals. John H sent me a link to this, so I wanted to pass it along to others who might benefit from it. The primary items I thought may be of interest to people in the Humboldt Microcontrollers
TI HAP-TOUCH BoosterPack
Group are the two Texas Instruments (TI) BoosterPacks. At least Ed and Nick have worked with the TI MCUs and these might be good prices for the HAP-TOUCH and Fuel Tank BoosterPacks if they're something they've been wanting to get. Again, my lack of electronics buying, or at least price-watching, means I don't know if these are super deals or just ok prices.

If you know of other MCU-related contests or good component pricing that you want to share, please send links to arcatabob (at) gmail {dott} com. Thanks!

**********

Monday, July 21, 2014

#8 Jeremy Blum Video: SPI (Serial Peripheral Interface Bus)

The topic of this Thursday's Humboldt Microcontrollers Group meeting is the #8 Jeremy Blum Arduino video tutorial, which covers SPI, the Serial Peripheral Interface data bus.
Jeremy's SPI diagram

Wikipedia says this about SPI:
"...SPI bus is a synchronous serial data link...that operates in full duplex mode. It is used for short distance, single master communication, for example in embedded systems, sensors, and SD cards. Devices communicate in master/slave mode where the master device initiates the data frame. Multiple slave devices are allowed with individual slave select lines. Sometimes SPI is called a four-wire serial bus, contrasting with three-, two-, and one-wire serial buses. SPI is often referred to as SSI (Synchronous Serial Interface)."
During the #8 video exercise, you will build a program using SPI, doing things like including the SPI library, setting the slave select pins, and sending information on the SPI bus with the SPI.transfer command. Going through this exercise doesn't make you an SPI expert, but it does help you learn a few basic aspects of SPI. For a more thorough background on this topic, take the time to go through the SparkFun tutorial on SPI.

AD5204BN10 digital potentiometer
In addition to SPI, the #8 video also introduces digital potentiometers. The digipot used in the #8 video is an AD5204BN10, which appears to be discontinued, obsolete or just very rare, so most people doing the exercise in this video will have to use an alternative digital potentiometer. I spent ten or fifteen minutes on Digi-Key trying to find an alternative component that was equivalent to the AD5204BN10 but finally decided I'll just wait to discuss that at the meeting on Thursday.

In the meantime, I did a bit of research on digital potentiometers so I'd understand a little more about how they work and when to use them. Analog Devices has a tutorial on digipots, and since they made the one that Jeremy uses in the video, I decided the AD tutorial was a good place to start. Nine pages later I decided I was wrong. The AD tutorial was written for an electrical engineer, not a novice electronics person. Electronic Design (ED) had a much better newbie introduction to digipots. ED said:
Breadboard setup for #8 video exercise
"Digital potentiometers are integrated circuits that implement a resistive ladder and a digital means of addressing a particular tap on the ladder that corresponds to the wiper position of a mechanical potentiometer. They’re used to calibrate system tolerances or dynamically control system parameters. Some of them have no on-chip memory. Others incorporate nonvolatile memory for saving the wiper position...What advantages do digital potentiometers have over mechanical pots? Obviously, digital pots can be operated in a closed control loop, and they don’t require physical access for adjustment. In addition, they offer higher resolution than mechanical pots, along with better reliability and stability, faster adjustment, better dynamic control, and a smaller footprint."
Jeremy's use for the digital potentiometer in the #8 video exercise is to vary the input voltage to LEDs to change their brightness. I don't know if that's a typical application for a digital potentiometer, but it's a good way to learn about this component.

If you're interested in microcontrollers, please come to the Humboldt Microcontrollers Group meeting this Thursday, July 24, from 6 to 8 PM at 1385 8th Street, Arcata, California, USA. Bring your questions and your enthusiasm -- we look forward to seeing you there!

**********

Sunday, July 20, 2014

Like Arduino? Like Python? Check Out Micro Python.

My knowledge about electronics and microcontrollers (MCUs) leaves a lot to be desired. My knowledge about computer programming, and Python in particular, leaves even more to be desired. However, if you like MCUs and Python, you might want to take a look at Micro Python, as I'm doing tonight.
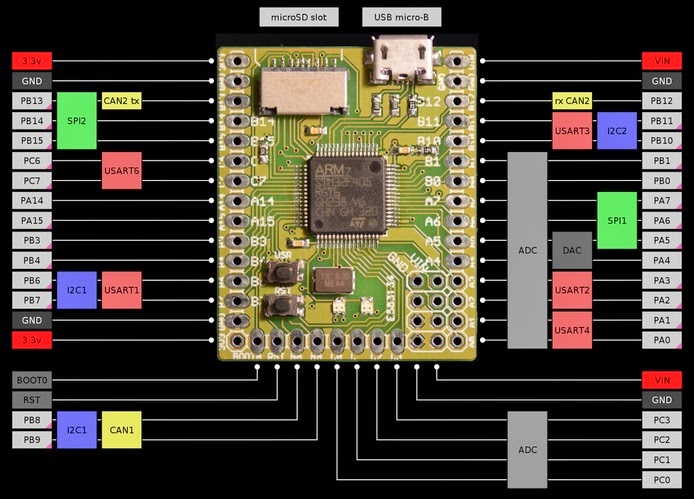
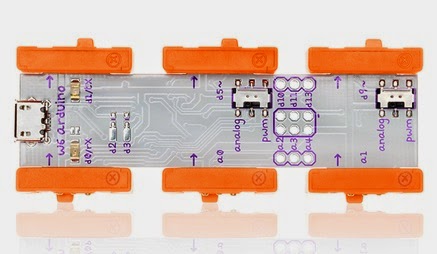
Micro Python pinout (from Kickstarter)

A Design News article from July 17 that I saw gives a brief overview of Micro Python. One of points of interest for me on this board is that the MCU is from STMicroelectronics. The only other blog post I've written about an STM board is the June 22 one about the $50 Lab-in-a-box. That board also had an STM32F4 MCU.
"The Micro Python board is based on the STM32F405 Microcontroller. It comes ready for Python programming...running 168MHz, with 1MiB Flash and 192KiB...The Micro Python board has a built-in interface for USB and functions much like a storage device. Programmers can write their Python scripts directly onto the battery-operated board and once stored, the Micro Python board will function entirely independent of a PC...the micro Python board comes pre-loaded with a micro SD slot, four LEDs, a clock that functions in real time, accelerometer, switch, and 30 I/O pins, including USARTS, SPIs, 12C buses, DAC and AC pins, and four powered servo ports...it functions right out of the box, as it's pre-installed with Micro Python...What’s really unique about this board isn’t the board itself, but the program upon which it’s based...Python can write functions, execute string processes, write classes, create lists and dictionaries, read and write files, create a generation
Packing Micro Python for shipment (from Kickstarter)
system, execute closures, design list comprehensions, and deal with execution handling. The Micro Python software is a leaner, cleaner version of Python intended for the microcontroller, but it actually works for PCs, too...Micro Python software is already available to the public through the MIT open-source license
..."
The development of Micro Python board was completed with funding from a Kickstarter campaign that was successfully funded on December 13, 2013. The campaign generated more than six times the initial funding goal of £15,000 set by its founder, Damien George, an Australian theoretical physicist at the University of Cambridge. In Damien's latest update on the Kickstarter site (June 21), he says they just finished sending out the last of the kits and boards to his Kickstarter supporters. The picture above looks like he had a pretty crowded apartment or house when they were packing everything up for shipment! An interesting Kickstarter side-note is that another campaign on there, SliceCase, leveraged the popularity of Micro Python by offering a case for that board as one of the SliceCase rewards. The SliceCase campaign only asked for £1000 and got 9X the original ask.
Micro Python SliceCase

The SliceCase / Micro Python synergy brings up a revenue opportunity that takes advantage short term trends. In my recent post about Spark.io, two principles I mentioned for the Humboldt tech, innovator, maker and entrepreneur (TIME) community to leverage are (1) focus on emerging technologies and trends (e.g. Python language and the 'maker movement') and (2) use Kickstarter and similar sites to launch products and gain visibility. In this instance, SliceCase no doubt benefited from the buzz that Micro Python had generated. It would be fun to launch a Humboldt Crowdfunding Entrepreneurs Meetup group, where half the purpose is to take an 'abundance economy' approach ('a rising tide floats all boats' rather than 'I want my piece of the pie') to Kickstarter and Indiegogo and people in the Meetup group would help each other become more successful at crowdfunding campaigns. The other half of the group's purpose would be to monitor crowdfunding projects on Kickstarter, Indiegogo and elsewhere, and to quickly and efficiently build crowdfunding campaigns that leverage publicity and successful funding of other crowdfunding campaigns.

The Micro Python is open source. Here's the GitHub project site to check out if that's of interest to you. I was glad I took a look at the GitHub site because it showed me that at least one GitHub site has a wiki component. I know less about GitHub than I do about microcontrollers and Python (sensing a theme here??), but I have several reasons to learn how to use GitHub effectively. One of those reasons is because the Humboldt Laser Harp (HLH) project code repository is being put on GitHub. I like wikis for aggregating and organizing technical information, and I'm looking forward to giving the wiki component of GitHub sites a look to see if has benefits for the HLH project.

In addition to finding out about wikis on GitHub, tonight's blog post also made me aware of a tech acronym that I either haven't seen before (which is hard to believe) or just don't remember. That acronym is MiB. And it doesn't mean "Men in Black." What it does stand for is mebibyte, where mebi is a binary prefix which means 2 to the 20th power. It is apparently used as a more accurate alternative to megabyte (MB). The Wikipedia entry for mebibyte says:
She turned me into a newt!
"1 mebibyte is 1048576bytes...The unit has been accepted for use by all major standards organizations, appears increasingly in scholarly literature and is part of the International System of Quantities. Many Linux distributions use the unit, but the unit has not been widely accepted in the computer industry or popular media."
Micro Python has enough visibility that it was written up in Wired in December 2013, and in June 2014 there was a blurb about it in InfoWorld. With Python currently being "the most popular language for teaching introductory computer science courses at top-ranked U.S. departments," and with a relatively active community on GitHub with 31 contributors, 2544 commits and 1082 stars, the Micro Python project stands a decent chance of building critical mass and being around for a few years. Lastly, if you're interested in learning more about the creator of Micro Python, there's a Hack A Day interview with him from November 2013.

If you want to play with a Micro Python board, you can sign up on the project's website, although I didn't see any estimated shipping date for people who weren't Kickstarter supporters.

**********

Saturday, July 19, 2014

The Humboldt Laser Harp Project: Part 2


So, I'm still glad I'm part of the Humboldt Laser Harp (HLH) project. But boy do I feel useless and clueless about what's going on from a technical standpoint...
SparkFun MIDI breakout board

There have been a few emails back and forth today between Ed, Nick and me about the HLH project. Ed's getting a lot of the programming concepts figured out, e.g. "...I think I've solved (assuming that any of this actually talks to a MIDI thing, anyway) the 16 string limit. The 16 MIDI channels are now dynamically assigned to different strings as needed, and released when the string is released. Not sure what would happen if you broke more than 16 beams. Probably the beams >16 simply wouldn't be played. Currently the notes have a hard cut on the end of them rather than a fade...I'll work on that if/when I have a sudden flash of insight. The number of analog input pins are the only limiting factor for the number of strings now. Given external comparators or an external (fast) ADC or analog multiplexer an Arduino could do a ton of strings with more or less this same code..." Nick is doing his part by pulling apart a laser and 3D printing a holder for the laser so we can easily fine tune where the laser is pointing. He's also going to dig up a USB MIDI input for Ed to use during the design phase of this project.
SDS-50J MIDI connector

Tonight Ed evaluated using a SparkFun MIDI breakout board vs. the SparkFun MIDI shield vs. rolling his own MIDI connection. He decided to roll his own, and at this point, all he needs is a CUI Inc SDS-50J MIDI (DIN 5 pin) connector and a Lite-On Inc 6N137 optocoupler. He's ordering those from Digi-Key, for a total of $1.78 plus shipping. Here's the optocoupler datasheet link if you want to read up on that.

Me? I'm mostly reading the emails about what they're doing.

6N137 optocoupler
Oh well, The important thing is a laser harp MCU device is being designed, the Humboldt Microcontrollers Group has launched their first group project, and we'll end up with v.1.0 of what will eventually be an interesting example of what you can do with MCUs.

Returning to the HLH launch meeting we had yesterday, here are a few other points about the project as it currently stands.
  • The laser harp will be the 'framed' style rather than the 'unframed' style. See the two pictures below.
    Unframed laser harp
  • The tentative height of the v.1.0 harp is 36 inches. The laser harp frame will probably be placed on a table when it's exhibited in public, and probably on a somewhat lower stand when a laser harpist is sitting in a chair playing it. The width will likely be between 36 and 48 inches, so that it's portable, so that an open horizontal hand can easily interrupt just one beam without accidentally breaking an adjacent beam, and so a laser harpist can comfortably reach all the beams.
  • Nick will provide computer speakers, a MIDI sequencer and an amplifier.
  • The goal of this project is to make a musical instrument, not just an electronic tone generator.
  • Yesterday's post referred to the Electronic Light Orchestra. The reason I used the word 'Light' in that descriptive name is because:
    • When the laser harp is in a dark environment, the laser beams will be a light source.
      Framed laser harp
    • Nick has a color organ we will work to integrate into the HLH. The light organ has RGB LEDs that change intensity and color in response to music (audio frequency range) and the settings of the organ.
    • If I understood Nick correctly, we may also try out incorporating some background laser light show effects with the HLH.
  • One aspect of the laser harp we need inspiration and a bit of technical expertise, or at least some creative thinking, is 'laser beam presence enhancing.' I hope that term is self-explanatory, but the issue we need to address is how to make a low-powered laser beam most noticeable by a person if the laser harp is not in a very dark environment or if the person playing the harp is not looking closely at the laser beam. Some of the enhancing techniques we've discussed are:
    • a fog machine, especially some type of 'fog' generator that specifically is generating or concentrating fog in the area where the laser beams are.
    • a black 'booth' or mini-pavilion that can be set up to enclose the laser harp and make the laser beams more visible.
      Fog machine
    • an air pulse generator that would put a concentrated air stream in the same location as the laser beam.
    • a water jet that runs in the same area as the laser beam.
    • Some other type of haptic signal that the laser harp player would feel when their finger or hand was breaking the laser beam.
  • I'm going to research laser safety issues to make sure we understand what laser strength or power is acceptable for use with the general public so we don't have anyone get burned by the laser (skin or eyes).
Enough for tonight. More HLH posts will be showing up over the next couple weeks. Maybe Ed or Nick will have something they get so interested in whilst working on their parts of the laser harp that they'll feel compelled to write a blog post or two!

**********