Monday, June 30, 2014

Saving Sensor Data With MCUs And microSD Cards

microSD card with adapter
If your microcontroller (MCU) project has sensors collecting data, you may want to save that data in addition to, or instead of, controlling with the data or displaying it on an LCD screen.

One way to save data generated by sensors on an MCU project is to use a microSD card. The microSD card (SD means Secure Digital) is a relatively compact and inexpensive way to store digital information. The microSD card is 15 x 11 x 1 mm, and an 8GB Class 10 microSD card can easily be found for $5 to $10 as of June 2014 in the US. Many smartphones or other mobile computing devices use microSD cards for expanding the memory capacity of the devices.
SparkFun microSD Shield

Today we'll take a brief look at the relatively easy approach to saving MCU project data -- using a microSD card add-on for an Arduino. If you go the 'microSD addon for Arduino' route, there are likely less expensive options, but the two safest ways I know of for an inexperienced MCU person is to go with the SparkFun microSD Shield ($14.95) and their microSD Shield Quickstart Guide or use the Adafruit microSD breakout board ($14.95) and their microSD breakout board tutorial. Ed Smith has experience with the Texas Instruments LaunchPad MCU board, so maybe he can do a future post about microSD BoosterPacks, and whether that data storage approach is significantly less expensive or easier to hook up and program.

I haven't used either the SparkFun or the Adafruit microSD add-on component, so this is the voice of research, not the voice of hands-on experience. After I build a data-gathering MCU project, like a gardening project that measures soil moisture or light, I plan to use one of the microSD card approaches to save the data from the sensors. At that point I'll write another blog post to discuss the process to hook up the microSD reader to the other electronics and highlight any issues I run into with the microSD add-on.
Adafruit microSD breakout board

The Adafruit microSD breakout board may have advantages, such as smaller board size, compared to the SparkFun microSD Shield, but if the other project components can accomodate the Shield, the inexperienced MCU project builder might be better off with the Shield because it's a more straightforward approach. Compare the SparkFun Shield picture, above left, to the Adafruit breakout board and breadboard approach, shown to the right. If your project is going to have other components that you'll need the breadboard for anyway, the Adafruit approach might be nice so you have better visibility for jumpering parts together and observing the operation of the Arduino once you've got the entire project connected. Only the hands-on experience following the tutorials for the SparkFun or Adafruit microSD card modules will show whether one approach is easier to get operating or more reliable once your project is actually being used for its intended purpose.

Another approach to using microSD cards with MCUs is to make your own circuit board and buy the MCU itself and a microSD card reader. I'll cover that approach in the future after we start designing circuit boards and getting them fabbed. And I'll also need to do a bunch more research about interfacing the MCU and microSD card reader.

To give readers of this blog a better perspective on using microSD cards with MCUs, or other ways to save MCU project sensor data, I will try to get one or several posts written by people who've successfully built projects that saved the sensor data. If you've done that and are willing to write a post about it, please contact me via email at arcatabob (at) gmail {dott} com. Thanks!

**********

Sunday, June 29, 2014

Power-Sipping Microcontrollers Use FRAM

Emerging technologies and new tech terms are something of high interest to me, so when I saw a couple recent articles about microcontrollers with FRAM, I needed to know more.

FRAM (also written as FeRAM), or ferroelectric random-access memory, is defined by Wikipedia as,
FRAM Cell
"...similar in construction to DRAM but uses a ferroelectric layer instead of a dielectric layer to achieve non-volatility. FeRAM is one of a growing number of alternative non-volatile random-access memory technologies that offer the same functionality as flash memory. FeRAM advantages over flash include: lower power usage, faster write performance and a much greater maximum number of write-erase cycles (exceeding 1016 for 3.3 V devices). Disadvantages of FeRAM are much lower storage densities than flash devices, storage capacity limitations, and higher cost."
The article titled "Comprehensive Ultra-Low Power FRAM Microcontroller Platform from Texas Instruments" looks a bit like it came directly out of the marketing department rather than the engineering department. Although I guess most, if not all, press releases are generated by marketing departments, so the wording shouldn't really surprise me. The numbers in the article may not be incorrect, but they sure are presented in a hard-to-believe so-much-better-than-the-previous-model way. The article says,
"Texas Instruments (TI) today announced its comprehensive ultra-low power FRAM microcontroller (MCU) platform with all the necessary hardware and software

tools...to reduce energy budgets, minimize product size and enable a battery-free world. TI's new MSP430FR59x/69x FRAM MCU families...range from 32 to 128 KB embedded FRAM. These MSP430™ MCUs are ideal for smart utility metering, wearable electronics, industrial and remote sensors, energy harvesting, home automation, data acquisition systems, the Internet of Things (IoT)...ultra-low-leakage (ULL) proprietary technology with embedded FRAM delivers the world's lowest system power with active power of 100 uA/MHz, accurate-RTC standby power of 450 nA...and an enhanced scan interface for flow metering that can operate while the system is in standby, resulting in 10 times lower power...FRAM is the only non-volatile embedded memory that can be written at 8MBps in under 800uA – more than 100 times faster than flash
."
The new MCUs sound like the definition of innovation -- "a battery-free world," "world's lowest system power," "10 times lower power" and "more than 100 times faster." If those terms are relevant and delivered on a cost-competitive basis relative to alternative components, there are definitely applications where it would be worthwhile to evaluate the IT FRAM microcontrollers. The Wikipedia article explains some aspects of the FRAM advantages,
"Flash works by pushing electrons across a high-quality insulating barrier where they get "stuck" on one terminal of a transistor. This process requires high voltages, which are built up in a charge pump over time. This means that FeRAM could be expected to be lower power than flash, at least for writing, as the write power in FeRAM is only marginally higher than reading...Flash memories commonly need a millisecond or more to complete a write, whereas current FeRAMs may complete a write in less than 150 ns."
 To benefit from the FRAM, MCU-system designers will have to focus on where the FRAM advantages over competing memory forms will pay big benefits. Two use cases that seem like the best candidates are energy-harvesting and remote sensors.

If you had some sample Texas Instruments FRAM MCUs, what would you use them for?

**********

Saturday, June 28, 2014

Looking At Arduino From A Programming Viewpoint

Because the Arduino single-board microcontroller is a piece of hardware, most of my focus in trying to understand the world of microcontrollers (MCUs) so far has been on the hardware aspect. You know -- what components hook up to which pins on the Arduino, and what do the different electronic components do in each of the circuits I cobble together.

To get the most out of microcontrollers, though, one also needs to understand the software or firmware side of things. To get a better picture of how Arduino software functions, you may want to consider reading an article John H from the Humboldt Microcontrollers Group linked me to. The article is titled, "Understand Arduino development" and starts out this way,
"Arduino is a fantastic platform for getting started with embedded software development. You are provided a development board, and programming IDE all configured to work together immediately. As a developer, all you need to do is write your program, press a button, and it is compiled and uploaded to the board where it begins execution. It's important you understand the fundamentals of what is happening in the background to make this work for you."
I need to do more online research about the differences between learning C and learning C++. Then I need to buy Nick or John a beverage and have a discussion about whether my C / C++ studies should be done with tutorials, websites and books that focus on C or on C++. If I need the basics of C to do much of anything in C++, it might be helpful to know what specific aspects of C++ should spice up my C studies. According to the article linked above,
"The Arduino IDE compiles your project as C++ using the GNU AVR toolchain...So you are writing "real" C++ code, though there are a few hardware limitations to keep in mind. It's called the GNU AVR toolchain because it compiles code for the AVR micro-controller architecture."
I am especially interested in the section of the article that talks about large projects. Most of my 'learning' projects will be pretty simple, but down the road I hope to get to the point where I'll build an MCU project with fairly complex functions and programming requirements. It appears it
will likely be helpful to learn how to write libraries in the Arduino IDE as well as sketches. According to the "Understand Arduino development" article,
"The Arduino IDE has the concept of a "sketchbook", and the programs that you write are called "sketches". So the sketchbook is a folder which contains all of your sketches...The sketchbook should also contain a folder called "libraries", which allows you to share code across sketches. Similar to structure of a sketch, a library needs to be a folder where the name of the folder is the name of the library...The main reason you would consider this is because you should split your project into multiple files by their logical function. You are not limited to using libraries to achieve this either, a sketch can have multiple source files...Splitting the project into modular files is key for long term development. It allows you to reuse code later on without having to copy and paste individual functions out of source files, rather you just include the library or add the source files to your sketch. When you make your project modular, you can document each module on its own, which allows others to use that module in their own projects without having to understand how the entire program works."
There are lots of two hour introductory classes or sessions on 'Learning The Basics Of Arduino' where a person starting with no knowledge about MCUs or electronics can hook together a basic circuit and make an LED blink. But like anything complex and powerful, there are many hours of study and experimentation required to become reasonably skilled in the Art of Microcontrollers. Reading about "splitting the project into modular files" reinforces that blinking an LED is significantly different from becoming skilled with MCUs.

Reading the article (twice, so far) that John linked me to and doing a bit of related online research has had a definite impact. It convinced me I need to block out more time in my schedule for completing the work in the Jeremy Blum video tutorials and for gathering background information for a couple microcontroller projects that aren't in the videos.

**********

Friday, June 27, 2014

Microcontrollers And A Humboldt Laser Harp

I need to find out if laser harps are a fairly common item in Arcata and Humboldt County. If they're not, building one could be a perfect project for the Humboldt Microcontrollers Group.
Laser Harp At Concert

First of all, if you don't know what a laser harp is, we'll turn to Wikipedia, which says:
"A laser harp is an electronic musical instrument and laser lighting display, consisting of several laser beams to be blocked, in analogy with the plucking of the strings of a harp, in order to produce sounds...They have also been used in public art installations...Playing the actual sound is usually handled by connecting the laser harp to a synthesizer, sampler or computer."
The picture at the right shows what one version of a laser harp looks like. The instrument can take many forms.Watching this short video clip will help understand what a laser harp is -- Bucharest Laser Powered Harp. The Bucharest video shows how engaging a laser harp will be for people walking past it. If you want to see someone playing music on a laser harp, watch Tetris Theme on Laser Harp. The Bucharest is a relatively simple version, something that would be a good exercise to build before attempting something like the Tetris laser harp.
Tetris Laser Harp

There are plans available for building a laser harp, many of which use an Arduino. Some plans have to be purchased, while other are free. It looks like a proof of concept might be something along the lines of the Ladyada laser harp exercise (pictures were on the page yesterday, but Flickr was having problems displaying them at the time I uploaded this post). That mini-project or one similar to it lets you learn the basics of sensing the laser beam and programming the microcontroller to respond when the beam is broken.

Once you've been able to generate music by breaking the beam, the next step would be to set up several laser beams so each one can be a different note. I haven't researched laser harps enough to know which would be a better route to go -- building one like the Bucharest laser harp in the short video linked above or building the one whose design is on open-source-energy and is quoted at ~ $100 for the parts and uses an Arduino Uno. It might be
Open-source-energy Laser Harp
quicker to build the open-source-energy one because it has all the plans and Arduino code. If I can recruit enough people to split the cost of the parts, or find a sponsor who wants to cover the whole cost, my vote would be to build the open-source-energy laser harp.

Finally, after we've gotten experience building a multi-beam harp and having it produce decent music, then we could design our own, more like the Bucharest one, that's designed for interaction with people who are walking by. To have the laser harp be interesting looking even if the room isn't totally dark, some people have built in fog machine capabilities so the fog will highlight the lasers. The fog would make the design a lot more complicated, but it might make the laser harp fun to use in a lot more environments.

The next step in deciding whether to move ahead on this is to find out if anyone else in the area is interested in building a laser harp. If I can find another person to work on it with me, we can at least do the proof of concept circuit. Then we'd have to choose a design for the multi-beam harp, price out the bill of materials and come up with a way to cover those costs.

If you're interested in working on a laser harp, send an email to arcatabob (at) gmail {dott} com. We can get together, figure out if we want to start with the Ladyada single beam exercise (if we can get the parts list, circuit designs and Arduino code) or if there's another low cost starter project to learn the basics.

Lasers are always a good thing to have in projects!

**********

Thursday, June 26, 2014

This And That: June 26 Grab Bag

Got finished with the Humboldt Microcontrollers Group meeting a little while ago, and now have to put together a random-microcontroller-stuff blog post since I didn't have a spare one waiting in the wings.

#1 This:   Just saw an interesting FastCoDesign article titled, "Arduino-Powered Lamp Changes Colors To Reflect The Weather." The article starts out like this:
"Remember how the enchanted ceiling in the Great Hall, in Harry Potter, resembled the sky above? Also: remember how the Weasleys had that clock that showed the status of each family member? This lovely Patch of Sky project combines the two and lets you magic up your home, too."
The rest of the article sounded good enough that I went to the website for the Patch of Sky lamp and watched the video. The end of the video showed a cool aspect of the lamp I hadn't
expected. The 'lamp' seemed to be showing sort of a twilight condition, then it started displaying a lightning lighting pattern. Thinking ahead to how people might hack this concept, I started imagining lighting effects you could create where you have multiple Patch of Sky type lamps around a room that use photosensors to display 'indoor lightning' effects driven by the intensity and duration of the lightning outside your house, or driven by the thunder intensity and duration which might give an interesting (or disorienting) delay effect.

#1 That:   At tonight's microcontroller meeting, Hal W talked some about the Humboldt Digital Art group and how he's interested in helping artists in the area get more involved with experimenting on integrating microcontrollers into their art. We'll talk more about that and do a bit of online research to find examples of how other artists are using Arduinos to either go in new directions or to enhance the space they were already working in. If you're an artist and interested in learning how Arduino or other microcontrollers work, please show up at a future Humboldt Microcontrollers Group meeting (next one is July 10). If you're an artist already working with microcontrollers, we'd love to have you join us at an upcoming meeting to talk about how you're using them and to teach us a few new MCU tricks. Maybe we'll start modifying the spelling to Artduino.

Of course, once I (so cleverly) spelled Arduino with the 't' in it, I had to 'google' it and immediately see that the spelling is (of course) in common usage. For example, there has already been an Artduino Maker Camp, where the event participants had sessions on the general topic of art and microcontrollers, as well as "electronic wearables, Arduino micro controllers, robotics, 3D printing, wireless controls and musical instrument making alongside dance, theatrics, and story hacking." The above link is for an Artduino Camp in Vermont, USA. At right is a photo from the Artduino blog hosted by WordPress. I can't say for sure if the photo shows an artist's incorporation of microcontrollers into his art because I'm guessing the blog is written in either Croatian or Kajkavian (the two languages in Zagreb, I think). Maybe there's an Artduino unconference in Humboldt's not-so-distant future...

#2 This:   Under the heading of really-small-Arduinos is the new Nanite 85. This development board doesn't have a ton of features and capabilities, but if you need a microcontroller that does what the Atmel ATtiny85 does, the Nanite 85 is mighty compact, measuring only 0.4 x 0.5 x 0.6 inches. I'll leave this blurb about the Nanite small, too. See the little picture at the left.

#2 That:   If you haven't done the #6 video tutorial from Jeremy Blum, you might enjoy a new level of capability that the exercises in this video brings you. John S mentioned at the microcontroller meeting tonight that it was a really fun experience to put together a microcontroller circuit, then write an Arduino sketch (program) and have the MCU controlling your computer (it changes the color on your computer screen). This opens up a whole new world of possibilities, where you'll have real world inputs (from something other than a keyboard, mouse or other typical personal computer input devices) actually controlling or changing your computer / screen. So you can build your own circuits to have pH sensors change your computer's output, or have the computer do a specified task when the temperature on the bottom of your coffee cup gets below 102 degrees. This is much different than making an LED on your breadboard blink.

The next couple Blum video tutorials cover some of the same topics discussed in #6. Hope to see you at the next meeting when we discuss the #7 video tutorial.

**********

Wednesday, June 25, 2014

Your Favorite Microcontroller Blogs

Your favorite microcontroller (MCU) blog or blogs may be included in the list shown below. If not, please send website addresses for the MCU blogs you like best in an email to arcatabob (at) gmail {dott} com.

Most people probably don't have a favorite MCU blog. However, regularly reading a quality MCU blog will be well worth your while if you want to:

  1. Be aware of new MCU-related product releases.
  2. Learn new tricks and skill for using MCUs.
  3. Be exposed to different MCU projects that you might want to copy or hack.
  4. Become aware of other MCU users whom you might want to connect with.
There are two basic types of MCU blogs; ones that have a narrow focus, such as and Atmel blog or an Arduino blog, and ones that cover a wide spectrum of MCU topics, manufacturers, skill levels and applications. The Humboldt Microcontrollers Community blog tries to present a fairly wide spectrum of topics because the primary goals of this blog are to connect MCU users with each other in the Humboldt region and to increase the number of people in this area who use microcontrollers.

Below is the start of a list of blogs you should consider reading either frequently or every now and then. A post on one of these blogs may spark your interest enough that you'll buy a couple new components, develop new programming skills, or start working on a project you would never have done if you hadn't read the blog post. Some of the blogs have more than just MCUs, but are pretty relevant to someone interested in MCUs.

Below is a variety of blogs -- see if one or several of them are your cup of tea.
  1. Evil Mad Scientist
  2. Adafruit Industries Blog
  3. uC Hobby -- Making things with Microcontrollers
  4. SparkFun Blog
  5. Official Arduino Blog
  6. Make: Magazine Blog
  7. Hackaday
  8. tronixstuff
  9. Embedds
  10. Atmel Blog
  11. TI MSP430 Blog
  12. 43oh -- MSP430 Projects
  13. Dangerous Prototypes
  14. Embedded Lab
  15. Electronics Lab
Tomorrow, June 26, is the next Humboldt Microcontrollers Users meeting, from 6 to 8 PM at 1385 8th Street, Arcata, California. I'll check with people at that meeting to see if they have favorite MCU blogs that aren't on the above list. Hope to see you at the meeting!

**********

Tuesday, June 24, 2014

Blum #6 Arduino Video Tutorial & Humboldt Microcontrollers Group Meeting

Tonight's post is a quick look at the #6 Arduino video tutorial from Jeremy Blum, which is the main topic for the Humboldt Microcontrollers Group meeting this Thursday, June 26.

The #6 video tutorial, 'Serial and Processing' takes a look at how to use an Arduino for communicating with the computer via a serial connection and using a programming language called Processing to visualize information from an Arduino on your computer screen.

For the serial communication between the Arduino Uno and the computer, the 0 RX (receive) pin and the 1 TX (transmit) pin on the Arduino are used. You connect the Arduino to your computer via a USB cable, which has 4 pins in it. One is power and one is ground. The other two are the serial transmit and receive pins. The USB transmit pin from the computer connects with the receive (RX) pin on the Arduino, and the computer's USB receive pin connects to the Arduino transmit (TX) pin.

Jeremy runs through a number of Arduino programming examples for learning how to use the serial communication features. If you go through the #6 Blum video and feel you still want a little more background on serial communication with Arduinos, here are three other resources to look at:
  1. The Arduino.cc reference page for serial communications
  2. An Arduino tutorial from Ladyada about serial communications
  3. A guide from Instructables on 'Serial Communications with Arduino'
After he does the serial communications exercises, Jeremy covers a little bit about the programming language Processing. You start out by going to the website for Processing. The home webpage for Processing says it's an open source language that:
"has promoted software literacy within the visual arts and visual literacy within technology. Initially created to serve as a software sketchbook and to teach computer programming fundamentals within a visual context, Processing evolved into a development tool for professionals...there are tens of thousands of students, artists, designers, researchers, and hobbyists who use Processing for learning, prototyping, and production."
In addition to the presentation and exercises with Processing that Jeremy Blum has for you in the video, if you want a better understanding of the language, you can spend some time going through some of the tutorials on the Processing website. If those tutorials aren't your cup of tea, take a look at these resources for learning the basics of Processing:
  1. The intro page from Arduino.cc for the Processing language
  2. A SparkFun intro called "Connecting Arduino to Processing"
  3. An Instructables session on "How to control LED's with Processing and Arduino"
Mark your calendar for this Thursday, and plan to be at 1385 8th Street, Arcata, California, from 6 to 8 PM for the Humboldt Microcontrollers Group meeting!

**********

Monday, June 23, 2014

Widgeduino & Free CapSense Kit

Tonight we have YAD (yet another *duino) and a freebie offer from Future Electronics and Cypress Semiconductor.

First, the free CapSense kit. We talked about CapSense at the May 29 Humboldt Microcontrollers Group meeting. As Wikipedia explains:
Theremin -- capsense
"...capacitive sensing is a technology, based on capacitive coupling, that takes human body capacitance as input. Capacitive sensors detect anything that is conductive or has a dielectric different from that of air. Many types of sensors use capacitive sensing, including sensors to detect and measure proximity, position or displacement, humidity, fluid level, and acceleration...Capacitive sensors can also replace mechanical buttons. There is also a musical instrument, the theremin, that uses capacitive sensing to allow a human player to control volume and pitch without physically touching the instrument."
A news item I saw in Electronics Weekly today says:
Cypress Semiconductor MBR3
"A capacitive sensing evaluation kit from Cypress Semiconductor is being made available free to design engineers by distributor Future Electronics on its ‘My Board Club’ website...The kit’s board also includes a proximity loop which can detect the presence of a finger or hand up to 30cm away...The devices and the kit use the EZ-Click software tool to configure capacitive sensing features...The kit works as a stand-alone unit and as an Arduino-compatible shield. It can be used to add a capacitive-button user interface to Arduino projects. To apply for the MBR3 kit, go to the website and enter the Fast Track code PRC46A."
If you want to experiment with CapSense, check out this offer and register and request a kit if it looks like it might have value for you. If anyone gets the kit, please bring it to a future Humboldt Microcontrollers Group meeting.

I don't know enough about microcontrollers (MCUs) and using them for process automation to know if tonight's second item, the Widgeduino, is a really interesting item, or if there are better ways to achieve the same end result. It definitely sounds like something I should spend more time on to know if it has cost-effective engineering and process controller capabilities. My main hesitation is that the Hackaday post starts out by saying Widgeduino is:
"revolutionary, intelligent and easily configured"
which immediately makes me put my hand on my wallet and causes me to look at the item being referred to as something that has trouble standing on its own merits. But the next part of the post sounds interesting enough to make me keep reading:
Widgeduino -- Examples of Widgets For Microcontroller Automation
"It is connected to the microcontroller based systems to allow the users to add multiple widgets such as keypad, LEDs, Gauges, Knobs, Sliders, Thermometer, Tanks, and Buttons etc. to their designs either for a rapid prototyping or to develop a complete automation system."
As a chemical engineer interested in open source hardware, open source labs and citizen science, the Widgeduino at first glance has enough possibilities that I'll spend some time seeing if it's all hype or not really baked yet, or whether it might be the beginning of a pretty cool tool for microcontrollers.

Widgeduino is a recently-launched Kickstarter project, and their goal is only £2200, so it seems quite possible they'll hit their target. The primary shortcoming of the project to me at this point is that it's a Windows-only application, which makes it less attractive from a standpoint of an automation system for open source hardware or an open source lab. Perhaps it will be a raise-the-bar situation, where enough of the right people in the maker community will find the Widgeduino concept or software so useful that they'll develop an open source version of it.

Perhaps a participant at the next Humboldt Microcontrollers Group gathering will know what else is available for MCU process automation software. That next meeting is this Thursday, June 26, from 6 to 8 PM at 1385 8th Street, Arcata, CA. Hope to see you there!

**********

Sunday, June 22, 2014

Microcontroller Kits For Students

Microcontroller (MCU) kits for students are of great interest to me for several reasons, but primarily because the Humboldt Microcontrollers Group will be offering one or several 'Intro To Microcontrollers' sessions to any interested Humboldt State University (HSU) students this fall. Additionally, it will be great if we are able to connect with Humboldt County high school students to offer opportunities of interest to them for learning about MCUs.

(There are many middle school students doing cool things with microcontrollers. But there are only so many hours in a week, and a person has to make decisions about how to spend their limited time. My top 'student' priority for the Humboldt Microcontrollers Group is getting as many college and high school students involved with the region's microcontroller community because that makes it easier on parents -- people in those two groups often don't need to rely on parents for transportation. However...  If any middle school students are interested in learning more about microcontrollers, or want to teach us new microcontroller tricks, we'd be happy to have them at the bi-weekly meetings of the Humboldt Microcontrollers Group, and we'd be thrilled to work with middle school teachers to figure out how we could help with 'microcontroller basics' activities.)

So, back to MCU kits for students. I read an ARM press release yesterday about a new $50 'Lab-in-a-box' kits aimed at university students for DSP (digital signal processing) audio. While the focus of this kit isn't 'basics of microcontrollers,' it does include an STM32F4 Discovery microcontroller board from STMicroelectronics. The press release says:
"ARM and its Partners will start shipping a digital signal processing (DSP) 'Lab-in-a-Box' (LiB) to universities worldwide to help boost practical skills development and the creation of new ARM-based audio systems. This will include products such as high definition home media and voice-controlled home automation systems...LiB packages offer ARM-based technology and high quality teaching and training materials that support electronics and computer engineering courses. DSP courses have traditionally used software simulation packages, or hands-on labs using relatively expensive development kits costing around $300 per student. By comparison, this new DSP LiB...will cost around $50...The DSP kits, powered by ARM Cortex-M4-based processors, enable high performance yet energy-efficient digital signal processing at a very affordable price. We expect to see them being used by students to create commercially-viable audio applications."
It's not a 'bad' thing that above Lab-in-a-box isn't a 'basics of microcontrollers' kit. Many students may be a lot more interested in a kit focused on practical applications of microcontrollers, such as "high definition home media and voice-controlled home automation systems" than a kit that just teaches them microcontroller basics.

The next step for the Humboldt Microcontrollers Group regarding the ARM LiB kit is to contact a few instructors at Humboldt State University to find out if they are already working with ARM or one of its partners to obtain at least one LiB kit. If it appears no HSU faculty are already working on this, we can ask if they are interested in collaborating with us on an opportunity for HSU students to work with this kit. Two people at or near the top of my HSU list to contact about this are David Marshall and Ken Owens, who did a Robot Camp at HSU last week.

In the 'it's a small world' category, the Humboldt Microcontrollers Group will be an especially good partner for HSU or College of the Redwoods for working with the LiB kit. Just last week at the
Humboldt Makers meeting, John H did a fantastic talk and demo about audio with a single-board microcontroller. Part of John's talk focused on the Wolfson audio card, so the Humboldt Microcontroller community has someone already very knowledgeable about using the audio electronics in the LiB kit. The Wolfson / Raspberry Pi combo picture on the left is from an Engadet article talking about the Wolfson card.

There are other MCU resources aimed at students. Here are a few examples -- these are aimed primarily at universities:
If you know of other student-focused microcontroller programs or cost-effective kits, please send an email with a link or other info to arcatabob (at) gmail {dott} com. It would be great to create a list of good microcontroller student kits and programs for Humboldt students to choose from. I'd like to have at least three or four low-cost 'MCU Basics' kits for student intro sessions, and it would be nice to have three or four other higher-cost kits for more involved MCU projects or workshops.

Because most teachers aren't microcontroller experts, and because they are already responsible for cramming more 'stuff' into their class time than is humanly possible, the Humboldt Microcontrollers Group might be able to offer opportunities outside the classroom for students to learn how to use Arduinos and other microcontroller-focused electronics. 

If you're a student, an instructor, or a parent of a student in Arcata, Eureka, McKinleyville, Fortuna, Trinidad, Blue Lake or any of the other fine parts of the Humboldt region who is highly interested in electronics or microcontrollers, please contact me. We can discuss ways to get you or your student(s) more involved with the Humboldt microcontrollers community.

**********

Saturday, June 21, 2014

Microcontrollers: Batteries Not Included. Or Needed.

The concept of energy-harvesting or energy-scavenging devices is intriguing to me. If the power for an electronic component or computing device comes from energy harvesting, you don't need to plug it in and you don't need batteries to power it.

Wikipedia defines energy harvesting as:
"Energy harvesting (also known as power harvesting or energy scavenging) is the process by which energy is derived from external sources (e.g. solar power, thermal energy, wind energy, salinity gradients, and kinetic energy), captured, and stored for small, wireless autonomous devices, like those used in wearable electronics and wireless sensor networks."
The concept of energy harvesting somewhat applies to the larger field of capturing needed energy from the immediate environment of the item that will use the energy. Examples of this larger definition include:
  • Regenerative braking, which converts kinetic energy of a vehicle into a stored energy form, such as a flywheel or battery, which can later be used to provide power to the vehicle.
  • Mobile items with solar cells, such as a car with solar cells on the roof that help keep the car cooled when it's parked in the sun, or the Soar Impulse aircraft (shown at right) that uses solar power it captures to both gain altitude (potential energy) and to charge its batteries during the day, then uses the altitude and batteries to keep itself flying through the night.
In terms of energy harvesting for microcontrollers (MCUs), a VentureBeat article, "Spansion goes battery-less with tiny ‘Internet of things’ chips," talks about two Spansion energy harvesting chips, MB39C811 and MB39C831, which can power MCUs. Spansion sees energy harvesting as one alternative for powering the Internet of Things (IoT).
"Spansion says it can eliminate the need to put a battery in the tiny sensors that will deliver the measurements from the Internet of things.” That should make it much more affordable to deploy billions of such sensors...By getting rid of the battery, such chips...will lower the maintenance costs significantly for companies that deploy networks of sensors for Internet of things applications...Spansion’s chips include a family of power management integrated circuits that can capture and store energy from ambient sources. Those include solar, piezoelectric (vibration), and temperature changes (Peltier). It could also use energy from electromagnetic induction."
An industrial use case for this combination of energy harvesting and low-power electronics is wireless sensor networks in large manufacturing facilities. Manufacturing equipment often generates vibration or heat, both of which can be used to power the sensor electronics and wireless communications systems. Had the US economy not crashed in 2007 / 2008, I quite possibly have been an engineer for a small startup that was going to install custom designed energy-harvesting wireless process sensor networks in aluminum smelters around the world. Aluminum production facilities are very large, so lots of money can be saved by not having to run process sensor powere and communications wiring throughout the facility. The recession caused the aluminum manufacturers and the startup company to put the project on hold for several years.

A potential application for energy-harvesting electronics like the Spansion chips mentioned above would be an agricultural monitoring system that has sensors spread out over several fields and greenhouses with a wireless communication system for getting the sensor data to collection nodes and to a central data storage and processing location. The energy harvesting means that power lines don't need to be installed to every sensor point and communication wiring doesn't need to be run to all the wireless modules. Energy harvesting powers the sensor electronics and the wireless communications electronics.

MCUs that would work well for this application are the sensor hub microcontrollers mentioned in yesterday's blog post, "Microcontrollers And Sensor Hubs," such as the Atmel SAM G microcontrollers. The SAM Gs are only 3 x 3 mm, and they use less than 7 µA in deep sleep with SRAM retention.

Although I can't immediately think of a Humboldt short term microcontroller application that requires energy harvesting, it would be interesting and educational to design and build a Humboldt Microcontrollers Group project that includes energy harvesting. And once we have familiarity with the energy harvesting circuits and the low-power devices that can be powered by the ambient energy that is collected, we may find financially viable applications, either in Humboldt County or elsewhere in the world.

**********

Friday, June 20, 2014

Microcontrollers And Sensor Hubs

An article about microcontrollers (MCUs) and sensor hubs caught my interest today because since I started trying to learn 'microcontroller basics' a couple months ago, I hadn't seen discussion of MCUs that involved sensor hubs.
Microchip Sensor Hub

In case sensor hubs are new to you, Wikipedia defines them as:
"...a microcontroller unit/coprocessor/DSP that helps to integrate data from different sensors and process them. This technology can help off-load these jobs from a product's main application processor, thus saving battery consumption and providing a performance improvement."
(As an aside, if you know a lot about sensor hubs and feel Wikipedia is a valuable resource, you might want to consider contributing content about sensor hubs to the Wikipedia entry. It is currently labeled as a stub.)

There are several reasons sensor hubs are of interest to me. First, I'm trying to learn all I can about microcontrollers, and it appears some sensor hubs are built with an MCU core. Second, I'm very interested in using sensors in MCU projects, and understanding sensor hubs will likely help me do a better job of designing and building sensor-dependent applications. Third, sensors are an emerging area of consumer technology, primarily because of smartphones, and mobile computing devices over the next few years are going to include a growing number of sensors. This chart, above left, from an Electronics360 article indicates the rapidly growing market for sensor hubs.

Atmel's sensor hub webpage mentions some of the sensors and mobile computing devices their MCU sensor hub systems are designed for:
"These can include motion sensors (accelerometers, gyroscopes and magnetometers), environment sensors (light level, color, temperature, pressure, humidity) and many others...These systems are required in a broad range of products such as smartphones, tablets, ultrabooks, IoT- (Internet of Things) enabled devices, gaming, healthcare, and wearable computing."
An article from April 2014, "Atmel, Qualcomm, NXP Lead Booming Sensor Hub Market" indicated Atmel has the leading market share (32%) for sensor hubs. The article goes on to say:
"The use of sensor hubs is increasingly crucial because of the push for 'always on' sensors used for activity monitoring, voice-command operation and contextual awareness...Three approaches are being taken to the provision of sensor hubs according to the report. One approach employs an external hub, typically a dedicated microcontroller (MCU), as offered by chipmakers such as Atmel, STMicroelectronics, Texas Instruments and NXP Semiconductor. Recent smartphones that use this approach include the Apple iPhone 5s, Samsung Galaxy S5 and the Motorola Moto X. A second method utilizes a low-power sensor hub as a low-power core that is part of the application processor, offered by Qualcomm, Intel and Nvidia. In future the Samsung Exynos range and MediaTek and HiSilicon are expected to follow this route...The integrated approach will overtake the MCU approach in the market after 2016...A third way for implementing sensor hubs is to integrate the hub logic, typically an MCU, with a cluster of sensors, typically an accelerometer and gyroscope. The accelerometer and gyroscope are the most common sensor combination, allowing for various levels of activity and motion tracking, ranging from step counting to more detailed motion tracking and contextual awareness."
It appears MCUs' role in sensor hubs may be short-lived for smartphones and other super-high volume mobile computing devices. But for battery-powered MCU 'maker' projects with lots of sensors, the ultra-low power MCU-based sensor hub may play an important role, or at least provide some good insights on effective circuit design. At the next Humboldt Microcontrollers Group meeting, I'll be asking if Ed or any of the others at the meeting have experience with sensor hubs.

**********

Thursday, June 19, 2014

TI Tiva-C Connected LaunchPad

Allow me to introduce the shiny new Texas Instruments (TI) Tiva-C Connected LaunchPad!


Lots of pins, two 40-pin BoosterPack headers, two buttons, four LEDs, a USB host/slave port and an Ethernet port! All for $20 with free shipping.

That last bit is why I bought one the moment I read about it. Then I started hoping that Energia supported it. Luckily for me, Energia seems to have started working with TI directly and already had support for this board. Energia is even linked on TI's product page and mentioned in the user manual / datasheet.

If you aren't familiar with Energia, it's a port of the Arduino IDE to work with TI LaunchPads. It supports most of the LaunchPads, and more are being added fairly regularly. Energia also has a decent pile of libraries for the various LaunchPads, including the basic i2c, SPI, and so on, as well as Ethernet and WiFi. This makes getting your LaunchPad connected to the outside world just as easy as with an Arduino.

That double row of 0.1" spaced holes along the bottom of the board are a complete breakout of all the pins. The manual / datasheet gives header part numbers you can buy from your favorite parts house and instructions to install them. Once you do, you can plug the entire board into the middle of a solderless breadboard. It's a fairly interesting feature, and one that I hadn't seen before.

The most attractive part of this board to me is the cost. At $20 it costs less than an Arduino ($25) or an Ethernet Shield ($31 for a genuine Arduino), let alone both. It even comes with a USB cable for programming it as well as an extendable/retractable Ethernet cable. To any annoyed Arduino fans out there, know that I too am an Arduino fan and use them often.

On the bottom of the Tiva-C Connected LaunchPad (that's enough of the official name, I'm going to call it the TM4C1294 LaunchPad from here on out; the core chip is a TM4C1294) we find female headers as well as pin designations:


The white stickers have your board's serial number and MAC (media access control) number, though you can set the MAC in software to be anything you'd like.

Beyond Ethernet, there are plenty more communication methods and channels at the TM4C1294's disposal.
  • 7 TTL Serial ports.
  • 3 I2C ports.
  • 6 SPI ports.
  • USB Host / Device port.
  • At least two CAN bus ports.
Is that enough for you?

Before you start worrying about having enough RAM for all this, let me assure you: You do. You get 256KB (that's kilobytes, no funny business with kilobits) of RAM, 6KB of EEPROM storage arranged in 32bit cells, and a full megabyte of flash storage for programs. Oh, and don't forget the 120MHz ARM Cortex A4 CPU with hardware floating point abilities.

For input / output you get 20 analog inputs spread between two 2 million samples per second 12bit ADCs, tons (>70) digital inputs/outputs, >20 PWM outputs, two pushbuttons and four LEDs, plus a RESET button and a WakeUp button. For a full rundown on the pins available in Energia, here's a pinmap.

So we've got tons of everything, what do we do with it?


Anything?

Beyond the snarky answer, I have no idea what you want to do with it. Here's something cool though! Texas Instruments bought a chunk of Exosite.com for people to use with LaunchPads, or any other device.

Exosite is a cloud storage and delivery platform, among other things. Using TI's section of it you can create a free account and start uploading your data, whatever it might be. Once it's there you can do all sorts of interesting things with it. I've been having it chart the light level in my living room for the last 18 hours or so. Here's the chart ti.exosite.com generates for me:


It can do far more than just graph data, as well. I'll go into more detail on how to get your TM4C1294 LaunchPad, Arduino Ethernet, Raspberry Pi, desktop computer, or anything else that can speak basic HTTP, connected to TI's slice of Exosite in a future blog post.

Alternatively, you have enough RAM storage and CPU power to use the TM4C1294 as a web host itself. If you're only going to use your data (whatever it might be) on a single network, there is no reason to bring the cloud into things at all. Writing webpages inside programs is time consuming, but certainly doable. The first thing I did was make a webpage hosted on the TM4C1294 that allowed me to turn the onboard LEDs on and off.

In conclusion, if you're looking to dig into the much vaunted Internet of Things, this might be a good place to start.

-Ed Smith

Wednesday, June 18, 2014

This And That: June 18 Grab Bag

Way too late at night for this tired person to start writing a blog post, so tonight will just be a smattering of random microcontroller related topics. Might follow up in depth on one or two of them after I have a chance to research  them a bit.

#1 This:  Today, June 18, was officially declared a National Day of Making, and the White House hosted a Maker Faire. I'm not much for political speeches, but as a maker and technology advocate, I thought President Obama's talk (see the video on the White House blog) was worth listening to. The White House blog post mentioned that:
"At the first-ever White House Maker Faire, the President also announced a host of new steps to spur manufacturing, innovation, and entrepreneurship by increasing the ability of more Americans, young and old, to have
3D Printed Pancake President At White House Maker Faire
access to tools and techniques that can bring their ideas to life."
We'll have to take some time to look at the 'host of new steps' announced by the President to see if any of them can help build the Humboldt Microcontrollers community, as well as the larger Humboldt Makers community. Maybe we should consider a group project to build a 3D pancake printer. Apparently they printed a pancake portrait of President Obama today at the White House Maker Faire. (See previous blog post about building a 3D pancake printer with Arduinos.)

Raspberry Pi with Wolfson audio
#1 That:  A Raspberry Pi is a single-board computer (SBC), not a microcontroller, but I found out tonight that there are use cases where distributed systems of multiple Arduinos are connected up to a Raspberry Pi. Ed Smith was discussing that after the Humboldt Makers Group monthly meeting tonight. John Hauser did an excellent overview and demonstration of Raspberry Pies (more than one Raspberry Pi :) at the Humboldt Maker meeting. We had a dozen people at the meeting who learned lots about the Pi and music, as well as a bunch of tips, tricks and watch-outs when working with the Pi.

#2 This: A interesting article on TweakTown reviewed the AdaFruit Neopixel. I wrote a blog post about LEDs earlier in June, and the Neopixel looks like something work researching more deeply. The
TweakTown article's conclusion was:
"Overall, when you compare the Neopixel strips with the cheap Chinese LED strips I have purchased on eBay in the past, the Neopixel blows them out of the water. This is the first strip of individually addressable RGB LEDs that I have actually gotten up and running within five minutes of opening the package...At the end of the day, I cannot recommend Neopixels from Adafruit enough. They are simple enough for even the most novice maker to get up and running, and for the advanced maker, the sky is the limit on what you can do with Neopixels."
#2 That:  Last item for tonight is the recent article about OpenSprinkler Bee Arduino Shield. Because of the high interest in the Humboldt region about organic gardening, local foods and similar topics, the OpenSprinkler Bee might be useful for one or several project this summer. It could even be part of a workshop on 'enhanced gardening.' The article points out that the OpenSprinkler Bee is:
"an open-source Arduino shield for battery-operated (latching solenoid) sprinkler valves. Ideal for projects that are designed to be used in the garden, lawn watering, flower and plant irrigation, together with other water based applications...“The main difference is that OSBee is designed to work with battery-operated sprinkler valves. These valves internally use a latching solenoid, which only draws power when you open or close the valve, and does not draw power if it remains in the same state. So it’s very efficient and suitable for battery-operated controllers."
The Neopixel and OpenSprinkler Bee are likely to be discussed in future posts that look at them in more detail.

**********

Tuesday, June 17, 2014

Arduinos & Motors: Why Use A Diode?

[Tonight's post is by Ed Smith, participant in the Humboldt Microcontrollers Group]

As you go through various electronics tutorials you'll notice that almost every wiring diagram for electric motors has a diode across the motor terminals. Here's an example of what I'm talking about, from Jeremy Blum's excellent Arduino Tutorial series:
Diagram courtesy Jeremy Blum.

You'll notice that he has a capacitor across the terminals as well; we'll get to that.

Diodes are very simple, very crucial little bits of silicon. They allow electricity to flow in one direction, but not the other. If you wired the one in Blum's diagram backwards, something would explode the moment you turned the transistor on, as the diode would allow the electricity to bypass the motor and flow straight from input to GND (ground, return, earth, common, whatever you'd like to call it). Blam! Oriented the correct way, no current flows through it from VCC to GND.

The diode is in the circuit because electricity that is flowing tends to want to keep flowing, just like water. If your transistor (switch, MOSFET, whatever) is turned on, current is flowing and the motor is running and you suddenly switch off the transistor then the current tries to keep flowing, slams into the turned off switch and stacks up. If you've ever turned a garden hose off quickly and noticed how the hose jumped, or turned a faucet off quickly and heard pipes banging, this is roughly the same effect. The water has mass, and when it crashes into the valve/faucet it generates a pressure spike. We measure electrical pressure in voltage rather than the PSI (pounds per square inch) we use for water (and it's not the electrons' mass that causes issues; the actual cause is more complicated than I want to get into here), but the result is the same: it eventually causes damage. In your house it will knock the pipes loose and/or burst them. In this circuit it will destroy the transistor, likely leading to a direct short to GND, a motor that runs indefinitely, and a transistor that may end up on fire.

The diode allows that spike to flow back around to the input of the motor. Then the electricity can happily go in a circle like it wants to, without either slamming into the transistor and spiking the voltage or flowing to ground through the transistor and running the motor.

(Unrelated comment on the diagram: In the video in which the above circuit is shown, Jeremy says the resistor is used to isolate the transistor/motor from the Arduino; this is not actually the case. The resistor limits the amount of current the Arduino puts through the transistor when it is switching it on. Without this resistor the Arduino and possibly the transistor will die. Don't forget that resistor!)

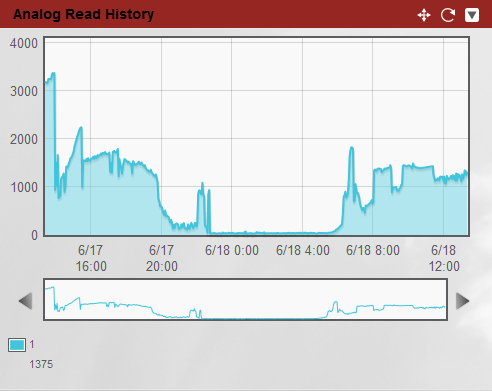
A PropScope USB oscilloscope was used to get some shots of this effect. I used an Arduino putting out a 490Hz PWM (pulse-width modulation) signal to switch an IRLZ34N MOSFET (metal-oxide-semiconductor field-effect transistor), driving a small motor out of a cassette tape player. (The MOSFET is rated at 55 volts, so it can take a spike the level that I was generating without damage. It's also far, far, far overkill for driving the little motor I used.) In each set of pictures below, the first picture is at an ~16% duty cycle (on 16% of the time, off 84%), and the second is at a 50% duty cycle. Input voltage was ~5.1 volts from an ATX power supply. The red trace is the signal to the MOSFET (5V turns it on and allows the motor to run, 0V turns it off). The blue trace is the voltage after the motor just before the MOSFET.

Here's no diode, no capacitor:


That's a 15.9 volt spike; if we were using a 10 volt transistor we would have issues! Generally a 2X over-rated part is nice and safe, but not this time. Were we driving a 12V motor this spike would be a lot higher, of course.


At a higher duty cycle the spike is both lower and shorter duration, I don't know why. Still, 12.27 volts is a big jump over the five volt input! Please note that this spike is due to current flowing through the motor coils, not due to the physical rotation of the motor. Any electrical device with a coil of any kind in it (relays are a common one) will cause this sort of spike.

The diode used is a UF4007, rated for 1000 volts and 1 amp; again, just a bit overkill. Note that the diode rating is how much it can block before it breaks down and allows two way flow, not how much can safely flow through it. With the diode in place, per the oscilloscope trace below,


5.8 volts is a much more reasonable spike; that's only a 0.7V gain. The reason for this gain is the diode's "forward voltage", which is a measure of how much of a voltage drop the diode causes to the voltage going through it. The higher the current, the higher the drop. For example, this diode has a ~1.7V drop when its maximum rating of 1 amp is flowing through it. Note how long the spike lasts! The energy that would have gone into the spike is now flowing in a circle through the motor, and it takes the motor a while to use it.


This time the longer duty cycle didn't change the spike's voltage much. Instead the lower energy level manifests as a shorter duration spike. Also interesting is that in both cases the motor's RPM was higher with a diode than without. This is likely because without the diode the motor has a reverse voltage across it trying to turn it in the other direction. With a diode, that energy is trying to turn the motor in the same direction it's already rotating.

Now about the capacitor I mentioned earlier! In the video in which the diagram was shown, Blum just said that the diode and capacitor protect things from noise and spikes. The diode takes care of spikes, as we saw. This leaves the noise for the capacitor to address. In this situation, "noise" typically speaks of electromagnetic noise rather than audible noise. Brushed motors are very noisy electrically and electromagnetically speaking, as the brushes connect and disconnect there are small arcs that broadcast themselves nicely.

I didn't have a 1µF capacitor sitting around, so I used a 10µF. Everybody loves overkill right?
Here's what I got on the scope:


That's a bit different, isn't it? Also interesting is that the motor ran much faster at this PWM duty cycle than it did in the previous examples. Note that we never actually got up to 5V; that spike is long gone.


Less time, and even further from getting to 5V! The motor ran much faster, as well. The reasons behind this I'm not entirely sure of, but here's my best guess.

When the MOSFET (or transistor) turns on, the negative side of both the motor and the capacitor are quickly pulled to 0 volts. When the MOSFET turns off, the capacitor's negative/ground pin is still at 0V, and the capacitor still has a 5V charge in it. This drives the motor until that charge has equalized. The curve continues up and comes back down in both situations. I think that this is due to that same spike being partially dumped into the capacitor, charging further. I am far from sure on that. Also of note, the low duty cycles were audibly quieter as well as electrically quieter.

One thing to be aware of before this starts looking like a wonderful idea is that the stored energy in the capacitor (its internal charge is equal, but its 'ground' pin is still a volt or three above what the MOSFET considers to be ground) will be pulled violently to ground when the MOSFET turns on. With a 10µF capacitor at a couple of volts and a MOSFET rated for 30 amps at 55 volts this is not an issue, but with a larger capacitor and/or a smaller MOSFET, it could be.

In closing, any time you are switching a device that contains a coil of any sort (relays, motors, solenoids, inductors, coil guns, transformers, etc.) you need a diode to direct that voltage spike to somewhere safe. The capacitor is more optional, and you're better off using a smaller capacitor than a large one unless you know you are having problems with electrical noise that you cannot solve in any other way.

**********

Monday, June 16, 2014

Voltset: Viewing And Recording Meter Data On Your Smartphone

It has always seemed to me that it would be a good idea for engineers and technicians to use their smartphone to view and record data from a meter.

Apparently the people involved with the Voltset Kickstarter campaign agree with me. Voltset is a module that plugs into a smartphone via a USB connection and turns the phone into a smart multimeter. The Kickstarter campaign has met its initial funding goal, so we'll find out if the Voltset team can deliver on their useful looking 21st century tool for the microcontroller enthusiast. If you want to get the deluxe model, the less-expensive early bird pledges are all gone, but you can still get the Voltset Pro for $139. The campaign has 13 more days to run.

An article titled "Voltset - Intelligent Multimeter for your smartphone" on Engineering.com recently described the device this way:
"The most interesting aspect of the Voltset for me was the identification tools. In the Kickstarter video a car battery is being measured, and Voltset recognizes that it's measuring a vehicle and gives the user standard measurements for car batteries. A second demonstration in the video shows an electrical outlet being measured with the same results. Several equations are built into the meter allowing makers to take data and have information beyond what is being measured. A data logging feature keeps the information to give users a history of their project."
Collect data in spreadsheet
You should really consider watching the video to understand the advantages of the Voltset versus just using a standard multimeter. I'm sure a couple of the Humboldt Makers would love to have the Voltset. I might just have to link Lonny and Gabe to this post just to see if they like the concept enough to spring for $139, plus $15 shipping.

My guess is that there will be a lot more devices like the Voltset over the next few years. Doing electronics, physics, chemistry and engineering labs in college with tools like the Voltset is going to have a radically improved data gathering approach compared to twenty years ago, or even compared to five years ago. One useful aspect of this tool might be the opportunity to revise the experiment procedure, while you're in the middle of the experiment, based on self-charting of the data being gathered. It might be immediately obvious that gathering data at two higher temperatures will give useful information, or that running the experiment again at a lower pressure will result in the best yield for a batch process.

Another aspect of the Voltset I like is the team that designed and is producing it. It appears to be a truly global diverse distributed team that would be challenging to work on and challenging to manage, but if you get the right group of people together, it would be an awesome and interesting way to collaborate. If interested in this aspect of the project, check out their Kickstarter page and go down toward the bottom to see who all is on the team.

Microcontroller users, open source hardware designers, biohackers, citizen scientists -- everyone who gathers data that can be measured by a meter is going to want a Voltset or its close cousin.

**********

Sunday, June 15, 2014

Free Stuff!! Convincing People To Use New Products

A recent news release aimed at the microcontroller and Internet of Things communities got me thinking about ways to participate on the leading edge of an emerging technology.

When someone develops a new product, they often need to also develop a market for that product. When that new product becomes available, people who might use it usually are busy with life and are not looking for and waiting for that new product to be released. Getting people to use the new product takes more than just making it available. If the new product is revolutionary, has immediately obvious benefits and is priced reasonably, the developer of the product need only do a good job of communicating to the target audience what the product does and how they can get the product. Then the money comes pouring in. That sometimes happens, like with the iPod, but it's rarely the situation.

If the product is evolutionary instead of revolutionary, if the benefits are not immediately obvious, or if it is priced high enough that people decide they'll do without or keep using a competitive alternative, the developer of the product must work much harder to get people to use or buy the new item. Some ways to engage potential users are:
  1. Provide free samples of the new product.
  2. Provide the new product at a very low introductory price.
  3. Provide services, for free or very low cost, that will help potential users understand the benefits of the new product and will help minimize the time and cost for them to begin using the new item effectively.
The news release I mentioned at the start of this post was about the Bluetook Smart Starter Kit, a free training package to,
"...walk developers through building a Bluetooth Smart device and creating a Bluetooth Smart Ready mobile application. The free kit is designed to work with an Arduino board (not included) and includes sample code to get developers up and running..."
If you want to create mobile apps that use Bluetooth and don't already have decent tools to let you do that, you might be interested enough to sign up and try out the 'free' kit. The kit is only software, so there is minimal 'cost' for these developer tools because companies must provide developer tools or no coder is going to develop apps that use the new product. The few app developers who take the time to even look at the free 'kit' will likely go 'meh' and continue using what they already use. A few people, most likely app developers who also like Arduinos, will seriously try out the kit. And a few people in the Arduino community might play with the kit because they're interested in Bluetooth.

A stronger way to convince people to try using your new product is to offer it for free when there is true value in them trying it out. A pre-internet example was receiving a small personal sample of a new type of shampoo or other useful consumer products in the (snail) mail. An example more relevant to people who work with microcontrollers is the 'free samples' which some electronics manufacturers offer.

Two examples of the free electronics samples are the Texas Instruments (TI) my.TI program and the Microchip Sample program. Create an account in those two programs, then you will be able to get designated electronics samples for free, usually new products. You might also be able to get individual samples for free even if a component is not listed as a free sample. Providing you with free samples is valuable to the manufacturer because you might not otherwise consider using that item, especially if there are obvious competitor items, either from the same company or from other companies, or if it's totally new. To use a new item, you have to spend your (limited) time learning how to effectively use it. People like free stuff, so giving away a few samples of relatively low cost electronic components can convince people to try using them.

The second way mentioned above to engage potential users is to price the new item low compared to its competitors. Right now Arduino single-board microcontrollers have a lot of media buzz and a very active user community. When TI released a new single-board microcontroller, the Tiva C Series Connected LaunchPad, they priced it significantly lower than the Arduino Uno with significantly better capabilities. That convinced one of the Humboldt Microcontrollers Group participants to order a Tiva C LaunchPad as soon as he read about it.

The third way mentioned above to get people using your new product is to provide services to help people more quickly start using your product. One examples of this is the upcoming MediaTek launch of the LinkIt platform for the Internet of Things and the MediaTek Labs developer support program.
"MediaTek Labs will stimulate and support the creation of wearable devices and IoT applications based on the LinkIt platform. Developers and device makers who are interested in joining the MediaTek Labs program are invited to email labs-registration@mediatek.com to receive a notification once the program launches."
Another example of providing user support is when a tech manufacturer or distributor sends a representative to a user group meeting to explain and promote their products. I worked with Adobe one time to put on a Tech Cafe in Milwaukee which talked about recently released Adobe products and gave a short workshop on how to use some of those products. Adobe sponsored the meeting by having one of their employees lead the workshop, and they provided breakfast and beverages for the workshop participants. Everyone thought that was fantastic -- learn about powerful products, like Creative Suite, get to ask a knowledgeable company rep questions and get informative answers, and have free snacks on top of it. What geek could ask for more than that?
Oh by the way, the Adobe rep gave away a $2500 software suite at the end of the workshop, along with a few other valuable Adobe goodies and company swag. That was an awesome way to support their users and potential users!

How could the developer of a new product get you to try it out? Maybe at the next session of the Humboldt Microcontrollers Group we can make a list of all the ways people at the meeting know of that companies are willing to support the microcontroller users community in Humboldt. And one or several of us can start reaching out to those organizations to make them aware of us and to let them know we are interested in working with them to expand the use of their products!

**********